I stumbled onto Longcat Video during one of those late-night rabbit holes where you’re just clicking through AI tools, half-curious, half-skeptical. Someone in a Discord channel mentioned it could turn a single sentence into a decent video clip. I thought, “Sure, another text-to-video tool — let’s see if this one’s any different.”
I spent the better part of a week testing Longcat Video — throwing weird prompts at it, tweaking settings I didn’t fully understand at first, watching some renders come out beautifully and others… well, less so. This isn’t a polished marketing pitch. It’s my field notes from actually using the thing, including the parts that frustrated me and the moments that made me lean forward and think, “Wait, that actually worked.”
What is Longcat Video & Top Use Cases for Creators
Longcat Video is a text-to-video and image-to-video AI model that generates short clips based on your prompts. It’s built to handle creative video generation tasks without requiring you to know After Effects or spend hours editing.
When I first tested it, I wasn’t expecting much. I typed in “a cat walking through a neon-lit alley at night” and hit generate. Four minutes later, I had a five-second clip that actually looked… pretty good. The lighting had that moody cyberpunk vibe, the motion was smooth enough, and the cat didn’t morph into a geometric blob halfway through (which, honestly, has happened with other tools).
Here’s where Longcat Video actually shines based on my experiments:
Content creators use it for B-roll footage — those quick establishing shots or transition clips that would otherwise take forever to shoot or license. I tested this by generating “sunrise over mountains with morning mist” and got something I could realistically drop into a YouTube intro.
Social media marketers love it for attention-grabbing snippets. Short, looping clips work great for Instagram Reels or TikTok backgrounds. I made a few abstract motion graphics just to see — swirling colors, particle effects — and they rendered faster than expected.
Indie game developers and storytellers are using it for concept previews or animatics. One friend in my testing group generated character movement studies to plan out animation sequences before committing to full production.
Educators and course creators find it useful for visualizing abstract concepts. I tried “DNA helix rotating with glowing nodes” for a biology explainer concept, and it gave me a clean visual in under ten minutes.
The key thing I noticed: Longcat Video works best when you’re not trying to replace professional videography, but rather when you need something good enough quickly. It’s a partner for ideation and rapid prototyping, not a replacement for a full production team.
Quick Start with Longcat Video (Text-to-Video & Image-to-Video)
Getting started is straightforward, but there are a few things I wish someone had told me before my first dozen failed attempts.
Text-to-Video is the simplest path. You type a description, pick your settings, and generate. I recommend starting with simple, concrete prompts. My first successful one was “a coffee cup steaming on a wooden table, morning light.” Simple subjects, clear action, specific lighting — that formula worked consistently.
Image-to-Video is where things get interesting. You upload a still image and Longcat animates it based on your text prompt. I tested this with a photo of a forest path and prompted “camera slowly moving forward through the trees.” The result had a nice cinematic dolly-in effect that actually felt intentional, not just random motion.
Here’s my actual workflow from my January 4 testing session:
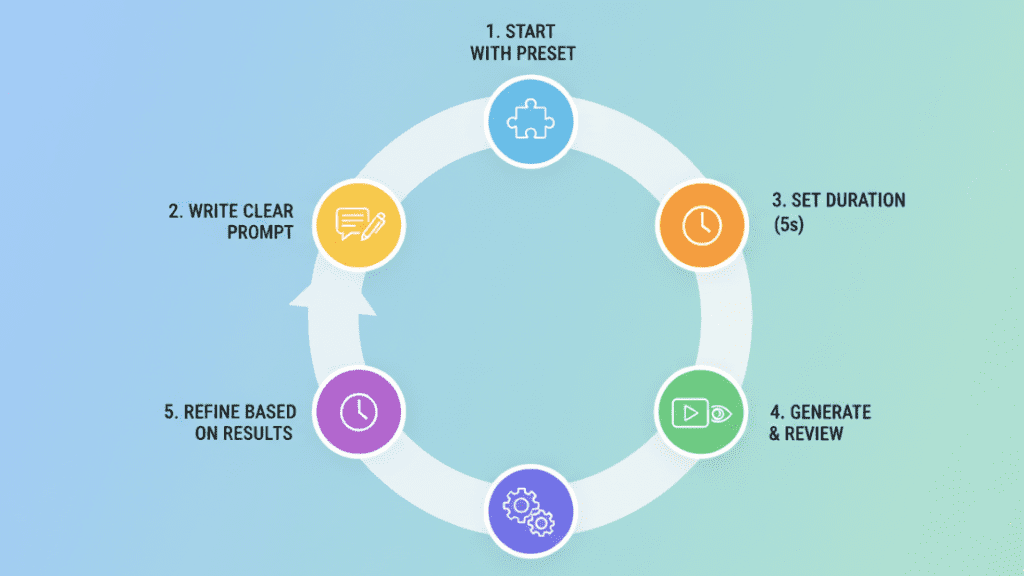
- Start with the preset that matches your goal (more on this below)
- Write a clear prompt — I aim for 10-20 words describing subject, action, and mood
- Set duration to 5 seconds initially — shorter renders let you iterate faster
- Generate and review — don’t change multiple settings at once or you won’t know what helped
- Refine based on results — if motion is too subtle, increase the motion setting; if it’s chaotic, dial it back
One thing that surprised me: the first render is rarely perfect, but the second or third attempt with small prompt tweaks usually hits the mark. It’s more forgiving than I expected once you learn its quirks.
If you’re still deciding whether to generate video directly or break ideas into reusable visual assets first, tools like Crepal can help you prototype visuals faster before committing to full video renders.
Recommended Presets by Goal for Longcat Video

Longcat offers preset configurations, and honestly, they saved me a lot of trial-and-error headaches. Here’s what actually worked for different goals during my testing:
For realistic scenes (like product shots or nature footage), I used the “Cinematic” preset. It balances motion and detail well. I generated “a smartphone rotating on a white background” and got clean, usable footage that looked professional enough for a demo video.
For creative/abstract content (social media loops, artistic videos), the “Dynamic” preset worked better. I made some swirling paint effects and particle simulations that had more energy and movement. The motion was bolder, which fit the vibe.
For character-focused clips, I stuck with “Balanced” mode. When I tried “a person walking down a city street,” higher motion settings introduced weird warping around the figure. Balanced kept things more stable.
For still-camera scenes, I actually lowered motion manually below preset defaults. My “cozy cabin interior with fireplace” prompt worked best with minimal camera movement — just subtle atmospheric details like flickering flames.
The presets aren’t magic, but they’re good starting points. I recommend picking one close to your goal, generating once, then tweaking individual settings from there rather than going fully custom right away.
Key Settings That Impact Longcat Video Quality
This is where I made most of my early mistakes. Longcat Video has several settings that dramatically affect output quality, and the relationships between them aren’t always obvious.
Duration, Resolution, Motion, and Seed Tips
Duration directly impacts both quality and generation time. I tested clips from 3 to 10 seconds. The sweet spot for me was 5-6 seconds. Shorter clips (3-4 seconds) felt rushed and sometimes ended abruptly mid-action. Longer clips (8-10 seconds) took significantly more credits and occasionally introduced consistency issues where the style or lighting shifted partway through.
Resolution is simpler: higher looks better but costs more credits and takes longer. I ran parallel tests on January 5 with identical prompts at 720p and 1080p. The 1080p version had noticeably crisper details, especially in textures like fabric or foliage. For social media posts, 720p was usually sufficient. For anything I planned to use in longer-form content, I went 1080p.
Motion is the trickiest setting. It controls how much movement happens in your video. I started by cranking it to maximum, thinking more motion = more interesting. Wrong. High motion on static subjects creates weird, unwanted camera drift or makes objects wobble unnaturally.
Here’s what I learned through painful trial and error:
- Low motion (20-40%): Best for close-ups, product shots, or scenes where you want atmosphere without distraction. My “steaming coffee cup” worked perfectly here.
- Medium motion (50-70%): Good default for most scenes with natural movement. “Waves crashing on a beach” felt appropriately dynamic without being chaotic.
- High motion (80-100%): Only for deliberately kinetic scenes. I used this for “abstract colorful paint swirling” and it worked. But when I tried it on “person sitting in a cafe,” they looked like they were vibrating.
Seed numbers control randomness. Same prompt + same seed = same video (theoretically). I used this when I got a result I liked but wanted to tweak just one setting. By keeping the same seed and only changing duration or motion, I could iterate on a successful base rather than starting from scratch each time.
Pro tip from my January 6 experiments: save your seeds for successful generations. I keep a simple spreadsheet with prompt, settings, and seed number for anything I might want to recreate or modify later.
10+ Prompt Pattern s That Work Best for Longcat Video
After generating probably 100+ videos, I noticed certain prompt structures consistently performed better. Here are the patterns that actually work, with real examples I tested:
- Subject + Action + Setting + Lighting
“A red sports car driving along a coastal highway at sunset” — This gave me clean results because every element is specified.
- Camera Movement Instructions
“Slow zoom into a vintage typewriter on a desk, warm afternoon light” — Explicitly stating camera behavior helped control the shot.
- Mood/Atmosphere Keywords
“Cozy bookstore interior, soft lighting, peaceful atmosphere” — Mood words influenced the color grading and pacing in subtle but noticeable ways.
- Specific Art Styles
“A forest path in the style of Studio Ghibli animation” — Style references worked surprisingly well for setting the visual tone.
- Simple Actions for Reliability
“A paper plane flying through clouds” — Simple physics = more consistent results. Complex actions often broke down.
- Texture and Detail Emphasis
“Close-up of rain drops hitting a window, shallow depth of field” — Calling out specific details improved rendering of those elements.
- Time of Day Specifications
“City street at golden hour with long shadows” — Time-of-day references helped with lighting consistency.
- Weather and Environmental Effects
“Snowy mountain peak with swirling clouds” — Weather effects added dynamism naturally.
- Abstract Concepts
“Colorful geometric shapes morphing and rotating, minimalist” — For abstract content, describing the visual language worked better than trying to convey meaning.
- Negative Space Composition
“Single tree in an empty field, drone view” — Simple compositions with clear subjects rendered more reliably than busy scenes.
Bonus patterns that surprised me:
Combining elements gradually: “Starting with a close-up of hands typing, then pulling back to reveal full workspace” — Scene transitions within a single clip worked better than I expected.
Particle/effect focus: “Glowing fireflies floating in a dark forest” — Small, repeated elements handled well.
Product showcase language: “360-degree rotation of a ceramic vase on a pedestal, studio lighting” — Commercial-style descriptions produced clean, professional-looking results.
What didn’t work well: overly complex prompts with multiple actions, requests for specific text or branding (it can’t do legible text reliably), and anything requiring precise facial expressions or hand movements.
Common Longcat Video Issues & How to Fix Them

Let me save you some frustration by sharing the problems I ran into and what actually solved them.
Blurry Renders, Jitter, Drift, and Failed Outputs
Blurry or low-detail output was my first major complaint. My initial renders looked soft and lacked sharpness. The fix wasn’t what I expected — it wasn’t just about resolution. I discovered that prompts with clear focus subjects rendered sharper. Compare “a forest scene” (blurry) versus “a close-up of moss-covered rocks in a forest, shallow depth of field” (sharp). Adding compositional specificity helped the model prioritize detail.
Also, I was generating at 720p to save credits. When I tested identical prompts at 1080p, the difference was significant. If sharpness matters for your project, the resolution bump is worth it.
Jittery motion or stuttering happened frequently in my early tests. The video would look like it was dropping frames or had inconsistent motion blur. After some research and experimentation, I found two causes:
First, motion settings that were too high for the content. A static scene with high motion creates artificial camera shake that looks jittery. Lowering motion to 40-50% for these types of scenes fixed it.
Second, overly complex prompts with multiple moving elements. When I tried “busy city intersection with cars, pedestrians, and cyclists,” everything stuttered. Simplifying to “cars driving through city intersection, aerial view” produced smoother results.
Unwanted drift or morphing was the weirdest issue. Objects would slowly transform into something else or scenes would gradually shift style. This happened most often on longer clips (8+ seconds). My “desert landscape at sunset” slowly morphed the dunes into weird geometric shapes by the end.
The solution: keep clips shorter (5-6 seconds max) or use the seed parameter to lock in consistency if you need longer content. Generate multiple shorter clips and stitch them in your editor rather than relying on one long generation.
Complete generation failures (when the render just doesn’t complete) happened about 10% of the time in my testing. Usually this was due to:
- Prompts with content that triggered safety filters (even unintentionally)
- Extremely complex scenes the model couldn’t interpret
- Occasional server issues (nothing you can do about this one)
When a prompt fails repeatedly, try simplifying it dramatically or changing the subject entirely. If “crowded beach party” fails, “people relaxing on a beach” might work.
Color inconsistency or strange tints appeared in about 15% of my renders. Clips that should have been neutral daylight came out with weird green or orange tints. Adding specific lighting descriptions helped: “natural daylight, color-accurate” or “neutral white balance” in my prompts improved color consistency noticeably.
One last weird issue I encountered: looping problems on clips I wanted to use as seamless loops. The start and end frames rarely matched, creating a visible “pop” when looped. Longcat doesn’t have a specific loop mode, so I had to either accept the pop or use video editing to create crossfades between the end and start.
Limits, Credits, and Watermark: What to Expect from Longcat Video
Let’s talk about the practical constraints, because this is where expectations meet reality.
Credit system: Longcat Video uses a credit-based model. For context, if you’re on a basic plan with 500 credits per month, you’re looking at roughly 20-25 high-quality videos. That’s enough for regular social media content but not for mass production.
Generation time varies. Most of my 5-second clips took 3-5 minutes to generate. Longer or higher-resolution videos could take 8-10 minutes. It’s not instant, so plan accordingly. I learned to queue up several generations in sequence rather than waiting around for each one.
Watermark situation: Free-tier generations include a watermark. Paid plans remove it. I tested both, and the watermark is noticeable enough that you’ll want a paid plan if you’re using this professionally. For personal experimentation, the watermark is tolerable.
Usage rights: According to the terms I reviewed, paid users generally have commercial usage rights for generated content. Always verify current terms for your specific use case, but this is a significant advantage over some competitors with restrictive licenses.
Fair use reality check: From my practical experience, Longcat Video is most cost-effective when you need specific, hard-to-film clips rather than bulk content. I wouldn’t use it to generate 100 generic stock clips, but for that one perfect sunset shot or abstract visualization I need for a project? Absolutely worth the credits.
Storage and download: Generated videos don’t stay in your dashboard forever. I noticed older generations (30+ days) started disappearing. Download anything you want to keep immediately after generation.
Best Alternatives to Longcat Video When It’s Not Ideal
Longcat Video is solid, but it’s not always the right tool. Here’s when I reach for alternatives, based on my comparative testing:
Runway Gen-3 is my go-to when I need more precise control over complex scenes or longer clips. It handles multi-subject scenes better than Longcat in my experience, and the motion controls are more granular. The tradeoff: it’s more expensive per generation and has a steeper learning curve. I used it for a project requiring consistent character appearance across multiple clips, something Longcat struggled with.

Pika Labs excels at stylized, artistic content. When I need something deliberately surreal or heavily stylized, Pika’s results often have more creative flair. It also handles aspect ratio customization better if you need non-standard formats. However, I found Longcat more reliable for realistic scenes.
Stable Video Diffusion is worth considering if you’re comfortable with more technical setups and want maximum customization. It’s the open-source route, which means more control but also more complexity. I only recommend it if you’re willing to tinker with settings and run it locally or on cloud compute.
Traditional stock footage still wins for specific, high-quality shots where you can’t afford any weirdness or artifacts. For professional client work where the footage needs to be pristine, I supplement AI-generated content with selective stock purchases.
Filming it yourself remains surprisingly viable for simple shots. I spent two hours trying to get Longcat to generate the perfect “coffee being poured” clip before realizing I could film it in ten minutes with my phone. Sometimes the old way is still the fastest way.
To be honest, I use Longcat Video alongside other tools. It’s in my regular workflow now, but it hasn’t replaced everything else. It’s best for rapid ideation, unique angles that would be impractical to film, and filling content gaps without breaking the budget.
What about you? Have you tried LongCat Video yet? Share your proudest prompt or your wildest “failed” generation (like when the cat suddenly turns into a geometric monster)! Got any weird ideas you want me to test for you? Drop a comment below—I’m dying to see everyone’s results. Who knows, maybe your prompt will make it into my next post!
Previous posts: