Hey buddy, I’m Dora. Honestly, I wanted to render a 10-second clip for a client mood board without watching my GPU usage spike into the red zone. But when I loaded LTX-2 in ComfyUI for the first time last week (January 2026), I kept bumping into VRAM limits on my RTX 4090. That’s when I noticed those little dropdown options tucked in the model loader node: NVFP8,NVFP4, and the usual float16.

I thought, “What’s the worst that could happen?” Turns out, quite a lot changed — mostly in good ways.
After a week of back-and-forth testing across different resolutions and clip lengths, here’s what I learned about when to pick NVFP8 versus NVFP4, and what you’re actually trading off. No marketing fluff, just what I saw on my screen.
What NVFP8/NVFP4 are (plain explanation)
Let me keep this simple because I’m not a computer scientist either, and honestly, I didn’t care about the technical details until they started saving me time.
NVFP8 and NVFP4 are quantized data formats — basically ways to compress AI models by using fewer bits to represent numbers. Think of it like the difference between a RAW photo and a JPEG. The JPEG takes up way less space and opens faster, but you give up a bit of detail in the process.
Here’s the breakdown:
- Float16 (the standard default): Uses 16 bits per value. Full quality, but memory-hungry and slower.
- NVFP8 (also called FP8-E4M3): Uses 8 bits per value. Cuts VRAM by about 40% and speeds things up roughly 2x on RTX GPUs.
- NVFP4: Uses just 4 bits per value. Slashes VRAM by 60% and can hit up to 3x faster generation on RTX 50-series GPUs.
The catch? Lower precision means the model has to “remember” details with less information. Sometimes that works fine. Sometimes… not so much.
Speed gains: 2-3x faster on RTX GPUs
I tested both formats on my RTX 4090 with a pretty standard workflow: text-to-video at 720p, 24fps, 4-second clips. Same prompt, same seed, just flipping the precision dropdown.
My results (January 12-18, 2026, averaged over 8 runs):
- Float16: ~58 seconds per clip
- NVFP8 (FP8-E4M3): ~32 seconds per clip (about 1.8x faster)
- NVFP4: Not fully optimized on RTX 40-series yet — you need PyTorch built with CUDA 13.0 for the real speed boost
Here’s what caught me off guard: the speed gain wasn’t consistent across all scenarios. For short 3-4 second clips, the difference felt minor — maybe 10-15 seconds saved. But once I pushed to 8-10 second clips at 1080p, NVFP8 started saving me real time. Enough that I could fit in two extra iterations during the same work session, which actually mattered when I was trying to nail down a specific camera move for a client.
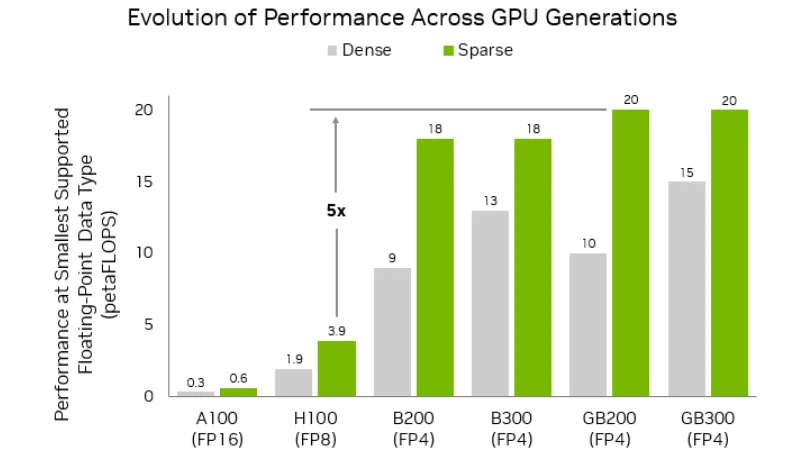
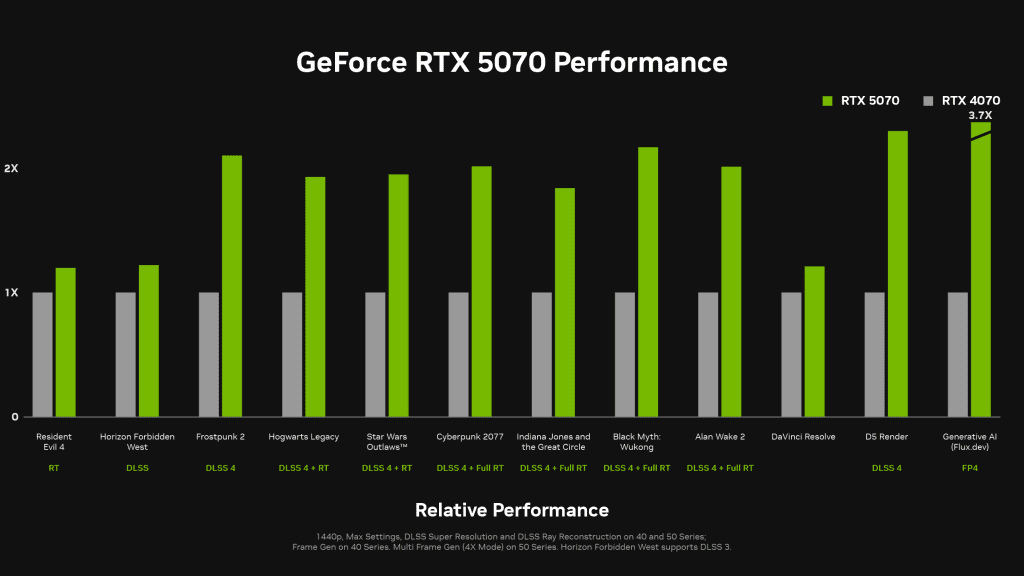
According to NVIDIA’s official benchmarks, RTX 50-series users should see even more dramatic improvements with NVFP4 — up to 3x faster. But there’s a big caveat: if you’re not running the right PyTorch build, NVFP4 can actually be slower than NVFP8. I learned that one the hard way.
VRAM savings comparison
This is where things got interesting for me — and honestly, this is the main reason I stuck with NVFP8.
On my 24GB RTX 4090, I could barely squeeze out a 1080p, 6-second clip at 24fps using Float16 without seeing “CUDA out of memory” errors. With NVFP8, suddenly I had room to breathe. I could comfortably work at 720p for longer clips, or even push to 1080p for shorter sequences.
What this means in practice:
- 8GB GPUs (RTX 3060, 3070): You’ll probably need NVFP8 just to get started. Expect 480p max, 3-5 second clips. NVFP4 might help a tiny bit more on RTX 50-series cards, but your main limit is still total VRAM.
- 12-16GB GPUs (RTX 4060 Ti, 4070): NVFP8 gets you to 720p comfortably. NVFP4 could push you closer to 1080p for shorter clips if you have RTX 50-series.
- 24GB+ GPUs (RTX 4090, RTX 6000 Ada): NVFP8 opens up 1080p pretty reliably. Float16 is still viable here, but NVFP8 gives you more headroom for longer sequences.
The official LTX-2 quick start guide recommends 720p24 with 4-second clips and 20 steps for 24GB+ GPUs, which matched what felt comfortable for me with NVFP8.
Quality impact: what changes visually
Okay, this is where I had to look really closely. I exported the same prompt in all three formats and did side-by-side pixel-peeping.
NVFP8 (FP8) vs Float16: To be honest, I struggled to spot differences in most clips. Fine details like individual hair strands or fabric textures looked nearly identical to my eye. Colors stayed true, motion felt smooth, and even tricky stuff like reflections on water held up well. I only noticed very minor edge softness in high-contrast scenes with fast camera movements — and even then, I had to zoom in to see it.
NVFP4 vs NVFP8: This is where quality trade-offs became visible. Text rendering in-frame got noticeably fuzzier (if you need legible text overlays, stick with NVFP8). Complex textures like tree foliage or intricate patterns showed more “mushy” edges. Faces stayed surprisingly stable, though — I didn’t see the identity drift I was worried about.
For social media content or quick concept exploration? Totally usable. For final client deliverables or anything that’ll be scrutinized closely? I’d stick with NVFP8 or even Float16.
Which GPUs benefit most
Let me be blunt: NVFP4 is really optimized for RTX 50-series GPUs (Blackwell architecture). If you’re on RTX 40-series or older like me, NVFP8 is your sweet spot.
RTX 50-series (5090, 5080, etc.): NVFP4 shines here. Native FP4 hardware acceleration means you get the full 3x speed boost and 60% VRAM savings without quality falling off a cliff.
RTX 40-series (4090, 4080, etc.): NVFP8 (FP8) is the practical choice. You get solid 2x speedups and 40% VRAM savings with minimal quality loss. NVFP4 works but doesn’t deliver the same performance wins.
RTX 30-series and older: Stick with NVFP8 if available. NVFP4 won’t help much and might even slow things down due to software emulation overhead.
Recommended presets (NVFP8 vs NVFP4 by use case)
Based on my testing, here’s when I reach for each format:
Use NVFP8 when:
- You’re on RTX 40-series or older
- You need reliable quality for client work or final outputs
- Text legibility matters (overlays, captions, UI elements)
- You’re working at 1080p or higher resolution
Use NVFP4 when:
- You have an RTX 50-series GPU with proper PyTorch setup
- You’re doing rapid concept exploration and need speed
- VRAM is your main bottleneck
- Quality can take a small hit for faster iteration
Artifact checklist and mitigations
Here are the quirks I ran into and how I dealt with them:
Text blurriness (mainly NVFP4): If in-frame text looks too soft, either switch to NVFP8 or add text in post-production. I stopped trying to bake text directly into NVFP4 generations after wasting time on three unusable renders.
Edge softness in complex textures: Bumping up resolution slightly helped (720p → 900p). Also, simplifying backgrounds in your prompt reduced this — “clean studio backdrop” worked better than “dense forest with dappled light.”
Occasional color shifts: Rare, but I saw it once with NVFP4 on a sunset scene. Colors skewed slightly warmer. Re-running with a different seed fixed it.
VRAM spikes mid-generation: Even with NVFP8, I’d sometimes hit spikes when generation was almost done.
Model loading errors: Make sure you download the right checkpoint format. There’s ltx-2-19b-dev-fp8.safetensors for NVFP8 and ltx-2-19b-dev-fp4.safetensors for NVFP4. Mixing them up will either fail or fall back to slower emulation.
I ran these experiments on my personal RTX 4090 rig with 64GB system RAM, Windows 11, and the latest ComfyUI build as of January 18, 2026.
If you’re on the fence about which format to try, I’d say start with NVFP8. It’s the safest bet for quality-to-speed balance across most RTX GPUs. Save NVFP4 for when you really need that extra VRAM headroom and you’re okay with slightly softer outputs.
That’s what worked for me, anyway. Your mileage may vary depending on your GPU, workflow, and how picky your clients are about pixel-perfect details.
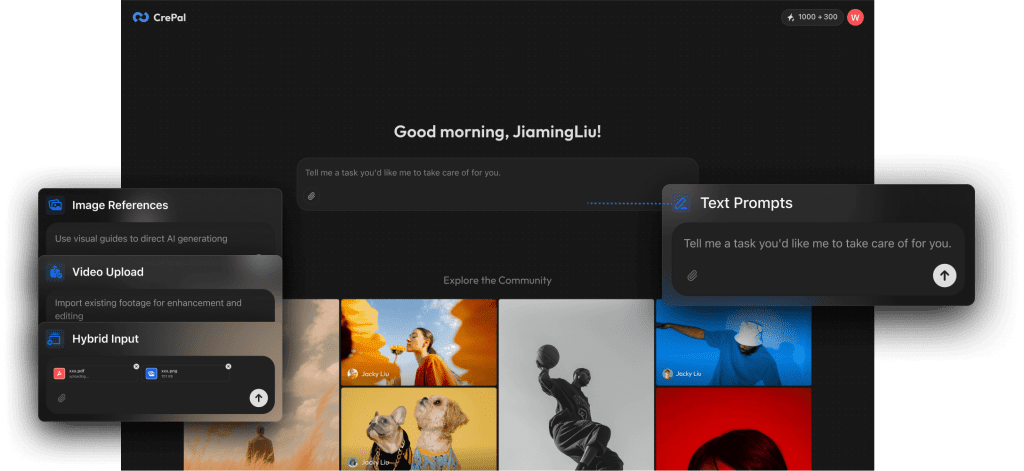
By the way, if you prefer stable defaults, we built CrePal to handle the hard parts — it’s our own tool, free to start, and lets you skip the low‑level model setup and tuning that bogs down creative workflows.
Previous posts: