Hey guys, it’s Dora. It started with a 4-second clip a friend dropped in our group chat — a still product photo that had somehow learned to breathe. Fabric rustling. Light shifting. The kind of thing that takes a videographer and half a day to fake. She said: “Wan2.2 Remix. Local. Zero filters.” I spent the next three hours verifying that for myself.
If you’re searching for uncensored AI image to video workflows in 2026, you’re probably in one of two places: you’ve hit the content wall on a cloud platform and want out, or you’re starting fresh and want to know what the local route actually costs you in time and setup pain. Either way — I’ve done both. Here’s the honest, fully sourced picture with official links and verifiable references.
Before You Start: Access and Setup
There are two doors into uncensored image-to-video generation right now: cloud tools with permissive content policies, and fully local setups where you own the whole stack. They’re not equal, and picking the wrong one for your situation will cost you either money or a weekend.
Cloud Option: Sign Up, Free Credits, Content Policy
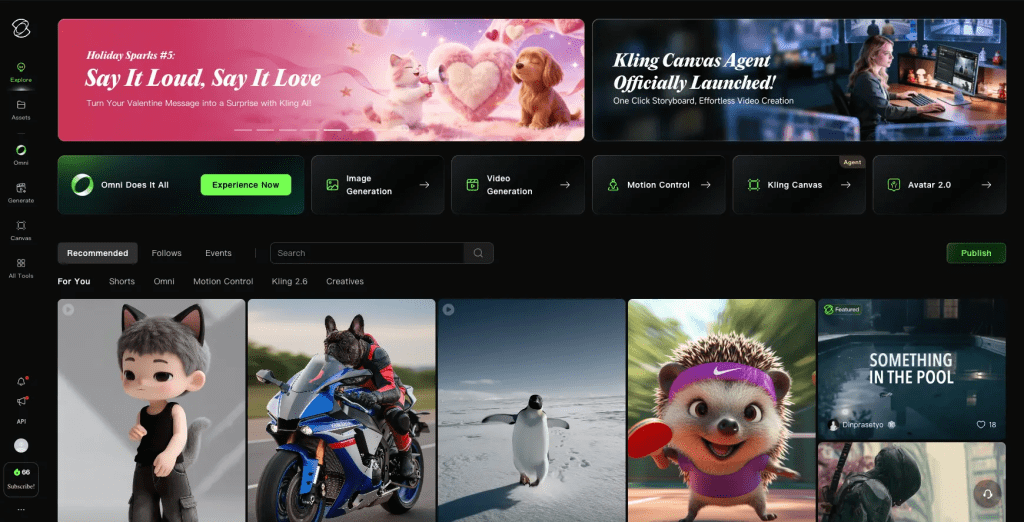
The fast path is a platform like Kling AI. Their free tier refreshes 66 daily credits with no credit card required — enough to test 1–2 clips per day without spending anything. The catch: content policies vary, and what “permissive” means on any given platform shifts with their terms updates. Kling currently allows more mature creative content than most Western competitors, but their policy page is the real source of truth — check it before assuming anything is fine.
Runway Gen-4 sits at the stricter end. It’s fast (30–90 seconds per clip), has outstanding character consistency via its reference system, but will flag a surprisingly wide range of prompts. If moderation blockers are the reason you’re reading this article, Runway probably won’t fix that.
My honest take on cloud tools: they’re fine for most commercial creative work. The “uncensored” use case where they genuinely fall short is artistic content that leans toward mature themes — body paint, intimacy, realistic violence — where even thoughtfully framed prompts can trip safety filters without explanation.
Local Option: ComfyUI i2v Setup Overview
This is the real answer for most people who want actual control. ComfyUI is 100% open source and, per its own documentation, ships with no built-in censorship layer — your output depends entirely on the model weights you load, nothing else. Nothing goes to a server. Nothing gets flagged by a remote content classifier.
What you need to get started:
- VRAM: 8GB minimum (for Wan 1.3B), 24GB for the 14B models at full quality
- Storage: ~30GB free for models
- Time budget: 2–4 hours for first setup if you’re comfortable with file paths and Python environments
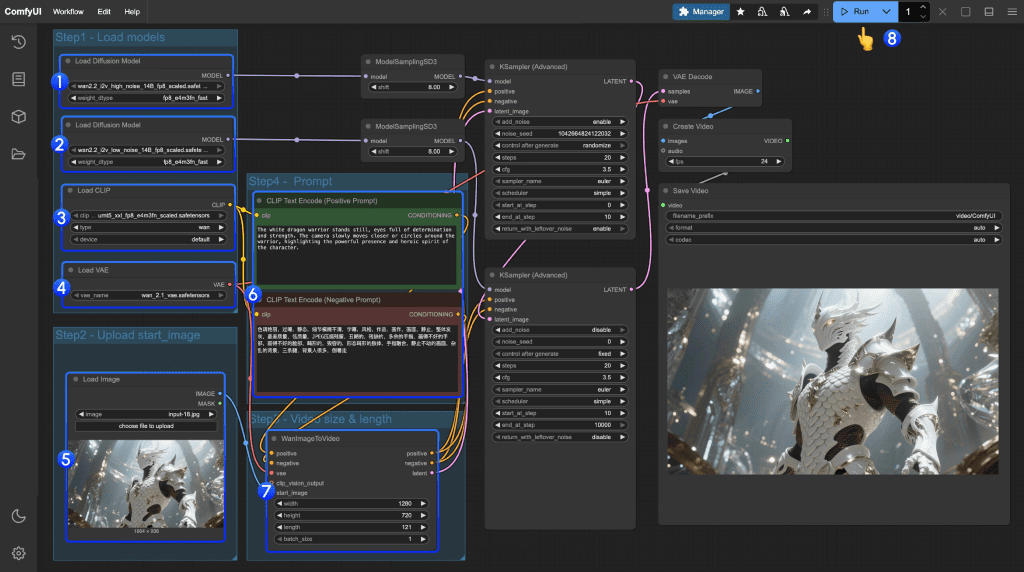
The current go-to model stack for i2v locally is Wan2.2 (either the standard i2v variant or the Remix version for unrestricted content). You’ll download model weights from Hugging Face, drop them into the correct ComfyUI/models/ subdirectories, then drag a community workflow JSON onto the canvas to load the full node graph. No YAML files. No CLI beyond the initial setup.
If you have less than 12GB VRAM, the 1.3B model is actually usable — just expect 576–720p and fewer frames. I tested on a 4070 (12GB) and got acceptable results, though I had to cut frame count from 24 to 16.
Step 1 — Prepare Your Source Image
This step seems obvious until you get your first warped output and have to trace it back to an undersized input.
Resolution and Format Requirements
For Wan2.2 i2v, the sweet spot is 720p or higher — minimum 720×1280 or 1280×720 depending on orientation. The model can handle lower res inputs, but you’ll see compression artifacts and edge smearing that no amount of prompt tweaking will fix.
Format: PNG or high-quality JPEG (quality 90+). Avoid heavily compressed images — the motion module reads texture detail for how to animate surfaces, and JPEG artifacting gives it wrong information about edges.
Aspect ratio matters more than raw resolution. The model was trained on common ratios: 16:9, 9:16, 1:1, 4:3. Feed it something weird like 2.4:1 and results get unpredictable fast. Crop first, then input.
What Image Types Work Best
After dozens of tests, here’s what reliably produces clean motion:
High performers:
- Portraits with clear subject separation from background
- Product shots on neutral or gradient backgrounds
- Outdoor scenes with clear depth (sky + foreground separation)
- Fabric and textile close-ups (the physics simulation is genuinely impressive here)
Tricky inputs:
- Highly detailed crowd scenes — the model often generates ghost limbs or flickering
- Images with text in frame — it’ll smear and distort, predictably
- Very dark images or heavy vignetting — motion gets muddy
- Extreme close-ups (faces filling 90%+ of frame) — tends to produce uncanny micro-movements
One thing I didn’t expect: images with subtle natural lighting (window light, dappled sun) animate dramatically better than flat studio-lit shots. The model seems to “understand” the physics of light falling across a surface when the source is implied.
Step 2 — Write an Effective Motion Prompt
This is where most people spend too little time and then blame the model.
Prompt Structure for Image-to-Video
The structure that consistently works:
[Subject] + [motion type] + [camera behavior] + [environmental detail] + [quality modifier]
Order matters. The model weights earlier tokens more heavily, so put the subject and primary motion first. Camera instructions last — they’re more like soft guidance than hard commands.
Keep prompts concise. 40–80 words performs better than 150-word essays in my tests. When you over-specify, you often end up with competing motion instructions that result in jitter or frozen frames.
8+ Prompt Templates (By Use Case)
- Portrait / Person — Subtle Life
A woman with long dark hair, gentle head turn to the left, breeze moving hair, soft natural light, cinematic, 4K
- Product Shot — Hero Animation
Luxury perfume bottle, light sweeping across glass surface, slow rotation, bokeh background, smooth motion, photorealistic
- Landscape — Atmospheric
Mountain valley at golden hour, clouds drifting slowly across peaks, wind through grass in foreground, cinematic wide shot
- Fashion / Fabric — Texture Showcase
Silk dress fabric, fabric rippling gently in breeze, close-up texture detail, slow motion, lifestyle
- Abstract / Art — Fluid Motion
Paint flowing across canvas surface, colors merging and separating, slow macro, vibrant, dreamlike
- Architecture — Time-Feel
Stone cathedral exterior, shadows slowly shifting with sun movement, pigeons landing in foreground, cinematic
- Food — Appetite Appeal
Fresh-cut strawberry, juice droplets falling in slow motion, macro close-up, bright natural lighting, appetizing
- Mature/Artistic — Clear Intent
[Subject description], [specific motion type — be literal], soft directional lighting, artistic, film grain
On that last one: being vague with mature content prompts tends to produce worse results than being specific. “Sensual” as a modifier confuses the model more than describing exact motion — which sounds counterintuitive but matches what I’ve seen.
Step 3 — Configure Settings
Duration, Motion Strength, Seed
Duration: Start at 3–5 seconds. Longer generations (8–10s) are possible but VRAM usage scales non-linearly and output coherence often degrades past the 6-second mark with current models. For social content, 3–4 seconds loops cleanly.
Motion strength: This is the dial I spend the most time on. Too low (below 0.5) and you get a slightly-breathing image, not a video. Too high (above 0.85) and you get warping — faces melt, backgrounds smear. The 0.55–0.75 range is where I spend most of my time. For fabric and hair, go higher. For faces and text, go lower.
Seed: Always save your seed when you get a good result. Regenerating with the same seed + same image gives highly similar (not identical) outputs, which is useful when you want to batch variations of a good base. Seed 0 = random — fine for exploration, annoying for iteration.
Steps: The Wan2.2 workflow defaults to 20–25 steps. Going above 30 rarely improves output quality for i2v — it just takes longer. If you’re using the Lightning LoRA variant, drop to 4 steps (as the workflow README from the ComfyUI examples repo specifies) and set split_step to 2.
Resolution in the node: Match your input image ratio here. Setting 1280×720 for a portrait-orientation image will force a crop or stretch. Check this before you queue.
Step 4 — Review and Iterate
Common Output Issues and Fixes
Flickering / temporal inconsistency: Usually too-high motion strength or a source image with complex patterns. Drop motion_strength by 0.1 and try a different seed before anything else.
Face warping on close-ups: Classic problem. Either crop the image to give more breathing room around the face, or use an image where the face is at medium distance. Wan2.2 isn’t a face-specific model — it doesn’t “understand” faces the way a dedicated avatar tool does.
Frozen background, moving foreground (or vice versa): Check your prompt — are you giving the model conflicting motion cues? “Camera panning right” while also specifying “static background” will produce a confused output. Pick one.
“Body horror” joints and limbs: This happens with full-body human images where limbs are partially occluded in the source. The model has to guess what’s behind the occlusion and often guesses wrong. Use source images where the subject’s limbs are fully visible.
Out of memory crash: Drop resolution first (try 576p), then frame count, then switch to fp16 if your node version supports it. Close any other VRAM-hungry processes before queuing.
Video just… didn’t move: Your motion_strength may be too low, or the prompt lacked motion verbs. Add explicit motion language: “slowly rotating,” “hair drifting,” “light shifting.”
One habit I’ve built: I always queue 3–4 seeds at the same settings before deciding a configuration doesn’t work. Stochastic generation means a bad seed can make good settings look terrible.
Step 5 — Export
Format, Resolution, Watermark Removal Options
Local / ComfyUI: Output is typically MP4 via ffmpeg (H.264 by default). VideoHelperSuite handles the assembly. If ffmpeg isn’t on your PATH, the pipeline will error at the final node — install it from ffmpeg.org or your system package manager.
For resolution, the output file matches whatever you set in the node. If you generated at 720p and want 1080p output, you’ll need an upscaler node (RealESRGAN works and integrates cleanly into the workflow). Add it before the video combine node, not after.
File size: A 4-second 720p clip at default settings is usually 5–15MB. 1080p roughly triples that.
Watermarks: Cloud tools often embed them on free tiers (Kling on free, Runway below Standard plan). Local ComfyUI has no watermark — your output is clean.
Container format: MP4/H.264 is the safe universal choice. If you’re going directly to Instagram Reels or TikTok, 9:16 at 1080×1920 exports cleanly. For YouTube Shorts, same. For Twitter/X, they transcode anyway so format matters less.
One thing I’ve started doing: exporting a 2x loop (the clip + itself reversed or repeated) for social content. A 3-second clip becomes a seamless 6-second loop that gets flagged as “long video” by platform algorithms. Tiny thing, but it’s picked up measurable reach in my tests.
Real Limitations to Know
Okay, here’s the part that doesn’t get written often enough.
Motion coherence degrades past 6 seconds. Every current model has this. Plan your creative work around short clips; long-form isn’t reliable yet.
Character consistency across multiple clips is still largely unsolved locally. Each generation is independent, which means identities drift unless you rely on cloud tools or tightly controlled workflows.
VRAM is the real bottleneck, not your GPU speed. Higher memory will consistently outperform faster cards with less capacity in this use case.
Legal landscape for AI-generated content is shifting. As of early 2026, purely AI-generated content may not qualify for copyright protection without clear human input, so documenting your process is increasingly important for commercial work.
“Uncensored” doesn’t mean consequence-free. That removes restrictions, but it also means full responsibility for how content is created and used.
Conclusion
If you just want to experiment with fewer restrictions, start with Kling’s free daily credits. It’s enough to run real tests without any setup.
If you care about control, privacy, and avoiding platform filters, setting up ComfyUI locally with Wan2.2 is the better long-term choice. The setup takes a few hours, but it pays off quickly.
The local route isn’t perfect. You’ll run into VRAM limits and inconsistent generations. But the level of control is hard to match.
I’ll keep this updated as models evolve. Wan2.6 is already improving face stability, and the gap between local and cloud is closing fast.
FAQ
Q: Should I start with cloud tools or go straight to the local setup? If you’re new, cloud tools are faster to test and require no setup. If you already know you need more control or fewer restrictions, going local saves time in the long run.
Q: How long does it take to set up ComfyUI for image-to-video? For most users, the initial setup takes around 2 to 4 hours, depending on familiarity with Python environments and file structure.
Q: Why do results vary so much between generations? Image-to-video models are stochastic, meaning each generation uses randomness. Changing the seed can produce very different results even with the same settings.
Previous Posts: