Hey, I’m Dora. I kept seeing creators on TikTok with those smooth, animated captions that seemed to pop perfectly in sync with their speech. Every time I tried to recreate it manually, I’d spend 20 minutes adjusting timing for a 30-second clip. Then a friend told me, “Just use CapCut’s auto captions.” I thought, “Sure, but it probably generates ugly default text that needs hours of cleanup.”
Truth be told, I was wrong. When I finally tested it, the AI picked up my words with maybe 85% accuracy, and the styling options were way more flexible than I expected. The captions didn’t look perfect right out of the box — but with about 5 minutes of tweaking, they looked like something I’d actually post.
If you’re exploring similar tools, this list of free AI video tools is a good place to see what other creators are using beyond CapCut.
Here’s what I learned from testing this feature across mobile, desktop, and web versions of CapCut, including the four most common errors I hit and how I fixed them without losing my mind.
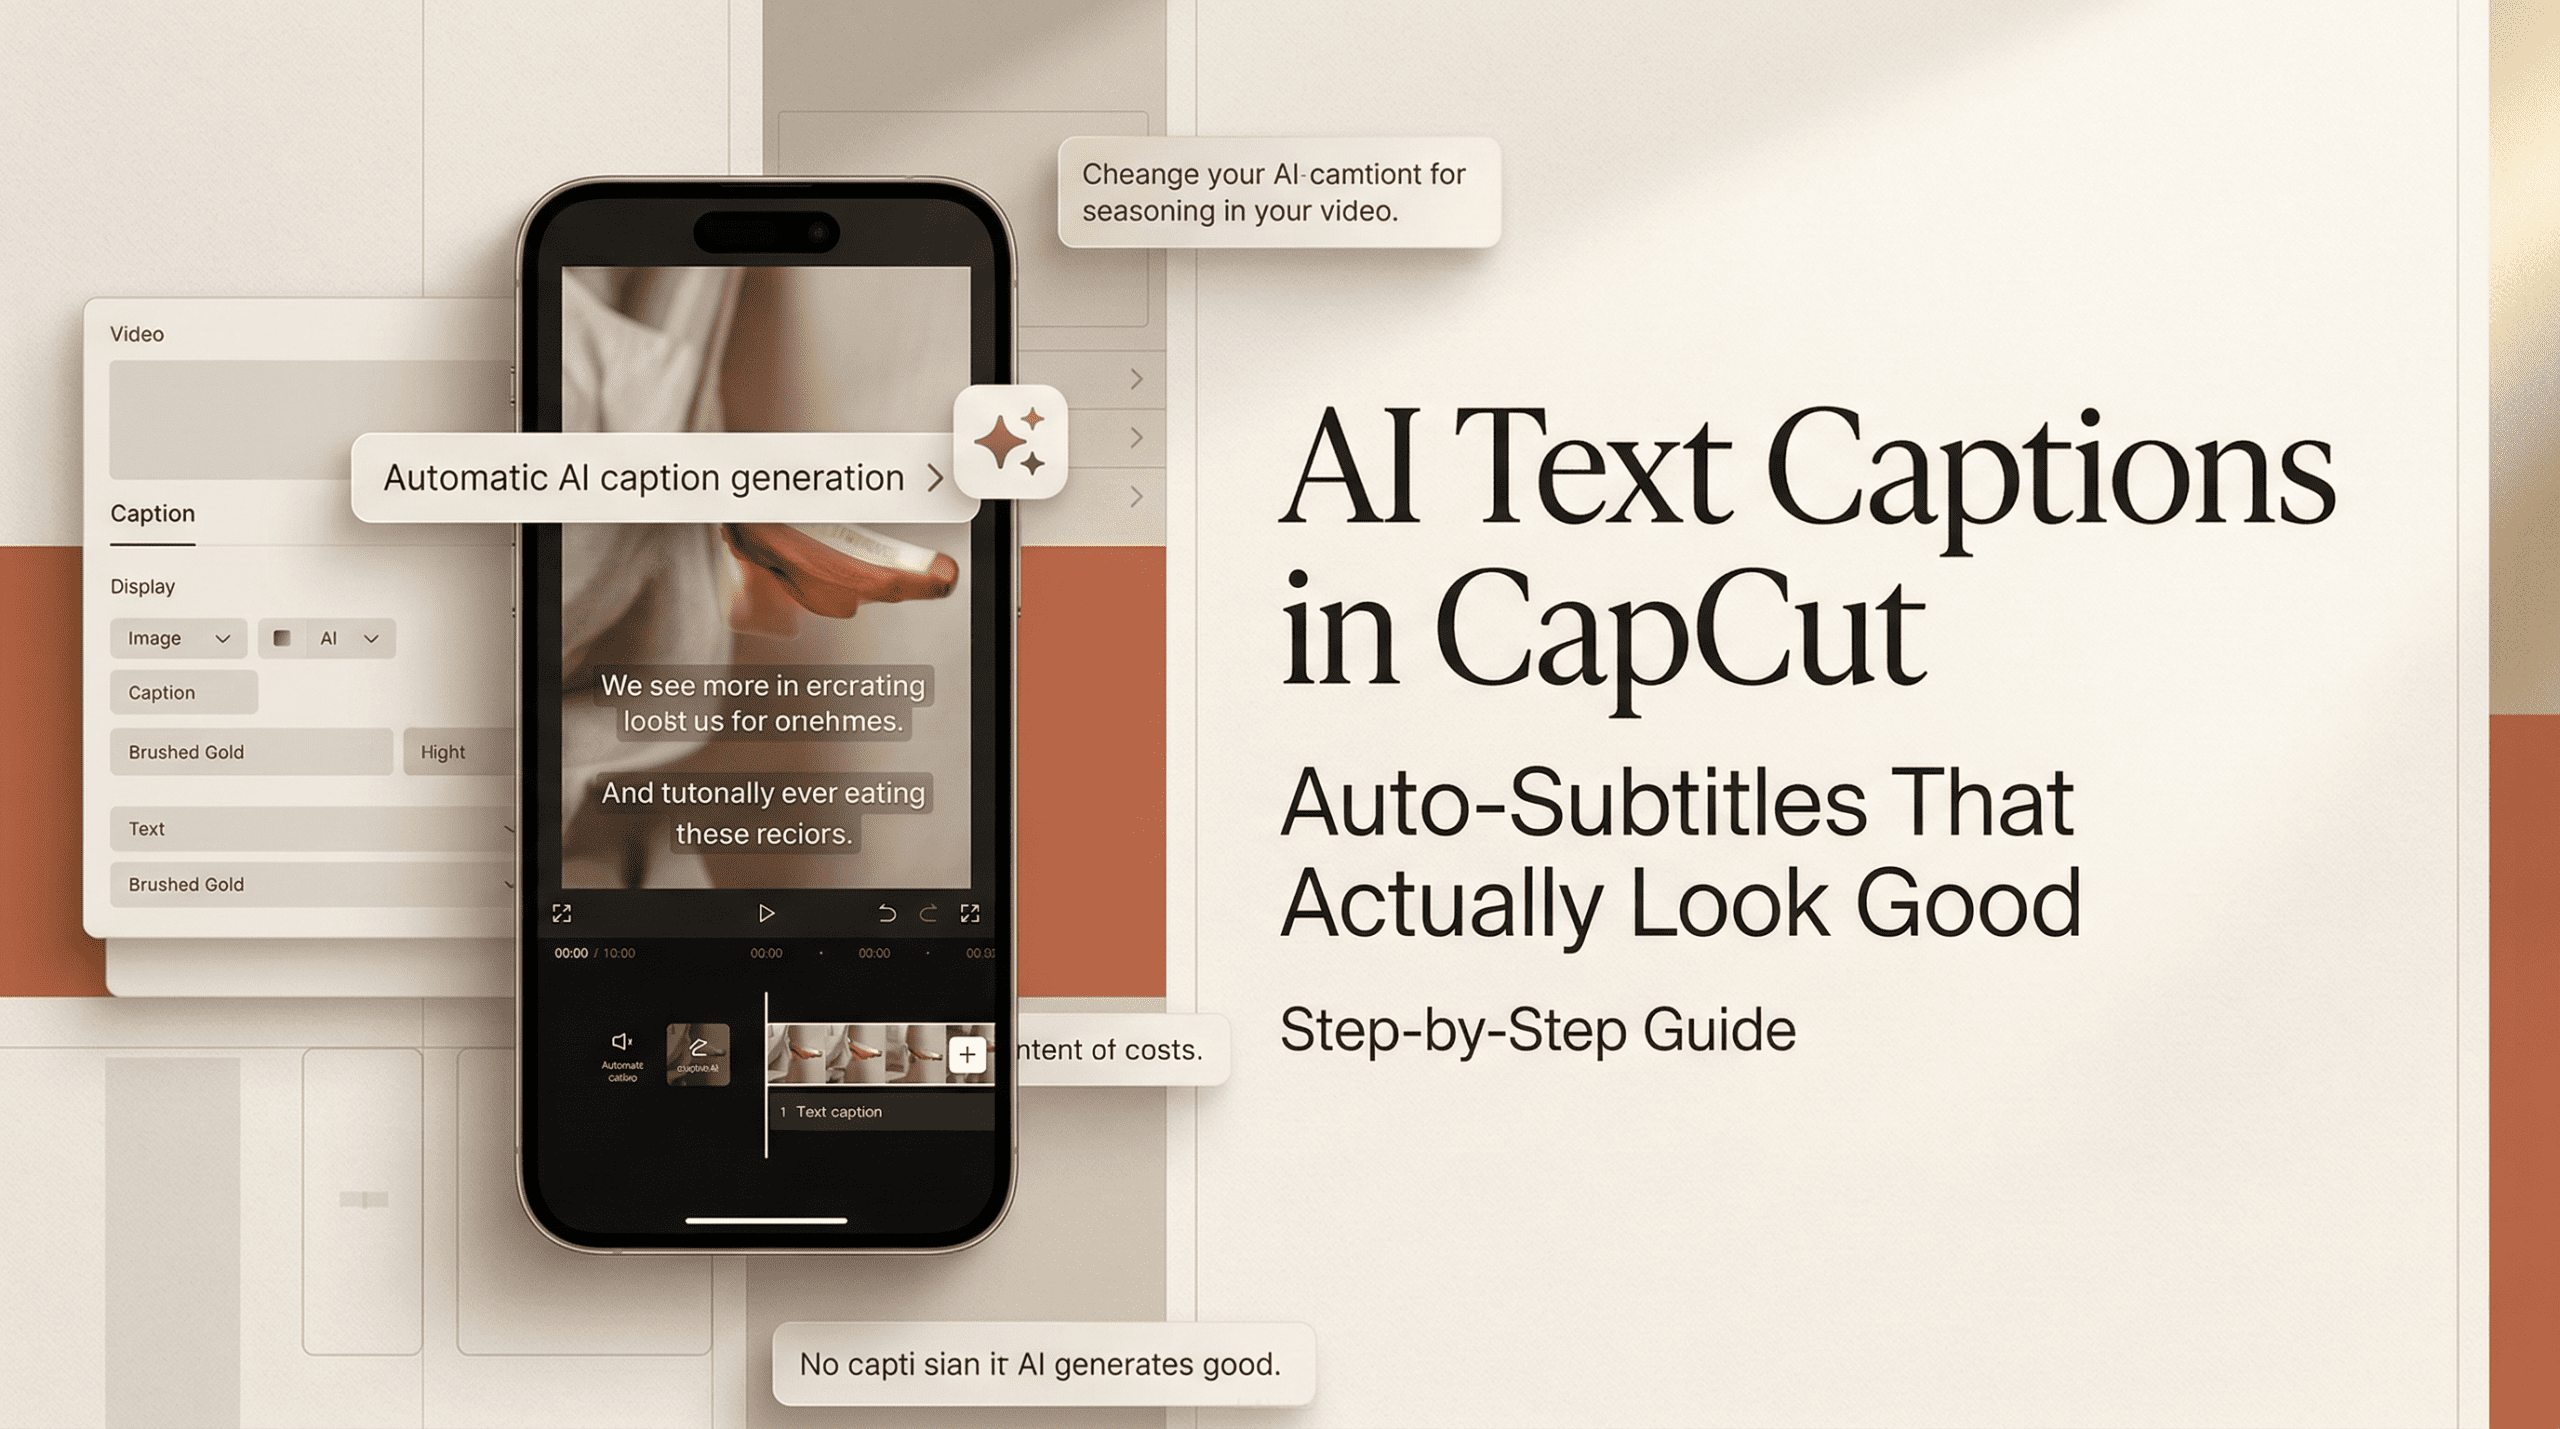
Where to find AI captions in CapCut (it moves around)
Honestly, the first time I opened CapCut looking for auto captions, I clicked around for a solid two minutes before finding it. The location shifts slightly depending on which version you’re using.
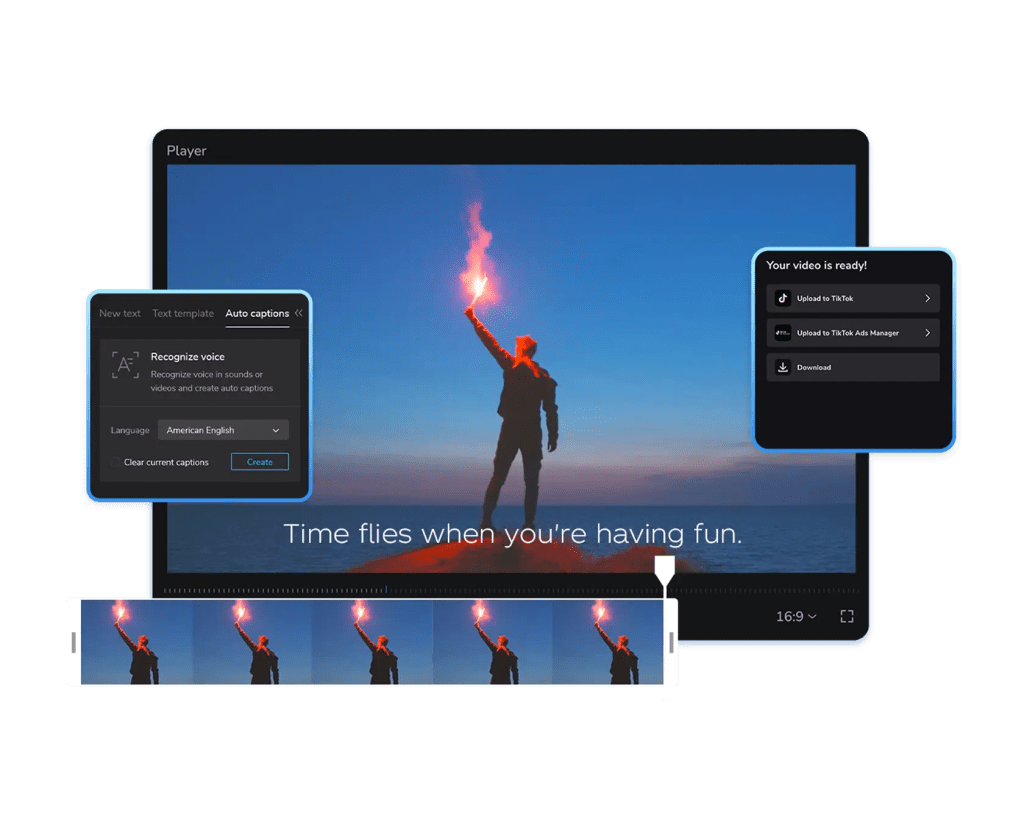
On mobile (iOS/Android): Open your project, tap the Text icon at the bottom of the screen, then select Auto Captions. It’s usually the first or second option in that menu. Sometimes it says “Auto caption” singular, sometimes plural — CapCut isn’t consistent with naming, which is a little confusing. If you need a visual walkthrough, CapCut’s official auto caption generator guide shows exactly where to tap.
On desktop (Mac/Windows): After importing your video, look for the Text tab in the top toolbar. Click it, and you’ll see Auto captions in the dropdown panel on the left. On older desktop versions, it might be labeled “Caption” without the “auto” prefix, but the function is the same.
On CapCut Web: Upload your video, and on the main interface you’ll see an AI captions section in the “You may want to try” area. Or go to the Captions tab on the left sidebar after your video loads. The web version auto-detects language, which is nice when you forget to set it manually.
Enabling auto-captions: the exact steps
Here’s the workflow I use now on all three platforms. It takes maybe 90 seconds from start to finish if your audio is clean. For a complete walkthrough with screenshots, check out CapCut’s step-by-step subtitle guide.
- Import your video into a new project. Make sure the audio waveform shows up in the timeline — if there’s no wave, CapCut won’t detect speech.
- Navigate to the auto caption tool (Text → Auto Captions on mobile/desktop, or AI captions on web).
- Select the language your video uses. CapCut supports 20+ languages, including English, Spanish, French, Chinese, Japanese, and more. If you’re not sure, some versions have a “Detect language” option that works pretty well.
- Choose your audio source (mobile only): You’ll see options like “Original sound,” “Voiceover,” or “Both.” Pick “Original sound” unless you added a voiceover layer separately.
- Hit “Generate” or “Create”. The AI processes your audio — usually takes 10-30 seconds for a 5-minute clip. For longer videos (over 10 minutes), it might take up to a minute.
- Wait for the captions to populate on your timeline. They’ll appear as individual text blocks synced to the audio.
That’s it. At this point, you have auto-generated captions. They won’t be perfect, but they’re a solid starting point.
Mobile vs desktop — what’s different
I tested both versions side-by-side in early March 2026, and here’s what I noticed:
Mobile generates captions faster (maybe because it processes shorter clips more often), but customization options feel cramped on a small screen. If you’re doing quick edits for Instagram Reels or TikTok, mobile works fine.
Desktop gives you more precise control over timing, font adjustments, and bulk editing. The timeline is wider, so it’s easier to spot and fix errors. I prefer desktop when I’m working on longer videos or need to fine-tune every caption block.
Web splits the difference — it’s faster than desktop but offers more screen real estate than mobile. Plus, it has a “Style captions with AI” button that auto-applies trendy caption templates (like Glow, Aesthetic, Trending), which is honestly kind of fun.
Customizing style so it fits your brand
Default CapCut captions look… fine. But they don’t look yours. To make them match your brand, you’ll want to adjust fonts, colors, size, and animation. CapCut’s AI caption generator offers dozens of preset styles if you want a quick starting point.
Font, color, size, and animation settings
After generating captions, tap or click any caption block to open the style panel. Here’s what I tweak every time:
Font: CapCut offers a bunch of preset fonts. I usually go with Montserrat or Bold Font for social videos because they’re clean and easy to read on small screens. Avoid overly decorative fonts unless you’re doing something artistic — they get hard to read fast.
Color: White text with a black outline or semi-transparent background is the safest bet. I’ve tried bright colors on light backgrounds and it always looks washed out. If you want color, test it on a few different scenes first to make sure it stays readable.
Size: Bigger is usually better for mobile viewing. I set mine to at least 40-50pt on mobile, 60-80pt on desktop. If viewers have to squint, they’ll scroll past.
Outline/Shadow: Add a dark outline (2-3px) or drop shadow to make text pop against any background. This is non-negotiable if your video has bright scenes.
Animation: CapCut has preset animations like “Pop,” “Fade,” “Slide,” and “Bounce.” I like “Pop” because it syncs well with speech rhythm. “Bounce” feels too playful for most content, but works for kid-friendly or comedy videos.
Apply to all: After styling one caption, hit the “Apply to all” button. This saves you from formatting 50 caption blocks individually. Sometimes this button doesn’t work on the first try (especially on mobile) — if that happens, force-close the app and try again.
Fixing the 4 most common CapCut caption errors
Even with AI, things go wrong. Here are the errors I hit most often and how I fixed them. If you run into issues beyond these, CapCut’s auto captions help center has troubleshooting tips for edge cases.

- Wrong words
The AI misheard something, or transcribed slang incorrectly. For example, when I said “let’s dive in,” CapCut wrote “let’s dine in.” Close, but wrong.
Fix: Tap the caption block, select “Edit captions,” and type the correct word. Changes save automatically. If there are tons of errors, your audio might be too noisy — try running it through CapCut’s “Noise Reduction” feature first, then regenerate captions.
- Bad timing
Captions appear too early or too late, so they’re out of sync with speech. This usually happens with fast talking or overlapping dialogue.
Fix (Desktop/Web): Position the playhead where you want the caption to start, then press Ctrl+B (Windows) or Cmd+B (Mac) to split the caption block. Adjust each segment manually.
Fix (Mobile): Tap the caption block, then tap the scissors icon to split. Drag the split segments to align with the audio.
Pro tip: Keep caption segments short — 2 lines max, 3-5 seconds each. Longer captions overwhelm viewers.
- Overflow text
A single caption block is trying to fit too much text on screen, and it gets cut off or wraps weirdly.
Fix: Split the long caption into two or three shorter blocks. CapCut doesn’t auto-split long sentences, so you have to do it manually. I try to break captions at natural pauses in speech — after commas or before conjunctions like “and” or “but.”
- Missing punctuation
The AI skips periods, commas, or question marks, so captions feel like one long run-on sentence.
Fix: Manually add punctuation in the “Edit captions” panel. I know, it’s tedious. But it makes captions way easier to read. CapCut’s AI is improving on this — in my February tests it added periods about 60% of the time, but commas and question marks were hit or miss.
Exporting captions with the video vs as a separate file
When you’re done editing, you have two export options: burn the captions directly into the video, or export them as a separate subtitle file.
Burn captions into the video (recommended for social media): Click Export at the top right, choose your resolution (720p, 1080p, or 4K), and hit Export again. The captions will be permanently embedded in the video. This is what I use for TikTok, Instagram Reels, and YouTube Shorts — platforms where you want captions to always be visible.
Export captions as SRT file (optional): CapCut Web lets you upload your own SRT files or download generated captions as SRT. Go to the Captions section, select “Export SRT,” and save the file. You can then upload this SRT separately to YouTube or other platforms that support external subtitle files.
Honestly, I rarely use SRT export. For most creators, burning captions into the video is faster and guarantees they’ll show up everywhere.
CapCut captions vs dedicated caption tools — when to switch
CapCut’s auto captions work great for quick social videos. But if you’re doing professional work — client projects, long-form YouTube content, or multi-language translations — you might hit CapCut’s limits.
If you’re curious how caption tools fit into the broader AI video ecosystem, this overview of the best AI video models in 2026 explains how different generation tools compare.
When CapCut is enough:
- Videos under 10 minutes
- Single language
- Simple edits (correcting a few words, adjusting timing)
- Social media posts where speed matters more than perfection
When to switch to dedicated tools:
- Videos over 20 minutes (CapCut Web has a 20-minute limit)
- Multi-speaker content where you need to label different voices
- Professional transcripts that require 99%+ accuracy
- Advanced features like speaker diarization or bulk find-and-replace
A final thought
What I keep coming back to is how much smoother the workflow feels when captions just… appear. I used to dread adding subtitles because it felt like busywork. Now it’s the easiest part of editing.
CapCut‘s AI isn’t flawless — I still spend 5-10 minutes fixing errors and tweaking styles. But compared to the 30-40 minutes I used to spend typing everything manually? That’s a trade I’ll take every time.
If you’re still hesitating, just try it once on a short video. Pick a 30-second clip, generate captions, fix the obvious errors, and export. You’ll know within 5 minutes if it works for your workflow.
Previous posts: