Hi there. Nice to meet you all again! I‘m Dora. After spending an afternoon testing whether a single photo could realistically turn into a moving clip, I quickly realized that not all “image-to-video” tools work the same. In this piece, I’ll break down what Canva’s image-to-video feature actually does, where it performs well, and where it falls short compared to true generative AI video tools.
What Canva’s Image-to-Video Feature Actually Does
Canva’s image-to-video capability is best thought of as a smart visual editor with animated presets, not a generative AI that invents motion from scratch. When you put a photo into a Canva video project, the app gives you tools to add movement, zooms, pans, fades, and simple scene transitions, and overlays like text, music, and stickers. It’s fast, accessible, and excellent for turning static images into short social clips.
Animation presets vs true AI video generation, not the same thing
Here’s the practical difference I noticed in my testing: Canva applies animation presets (think: zoom in, slide left, pan up) to layers or entire pages. Those are deterministic effects, the app isn’t analyzing a photo to create depth-aware parallax or to synthesize new frames that move a subject independently. In contrast, “true” image-to-video AI (the newer generative models hitting headlines) predicts intermediate frames or synthesizes camera movement by estimating 3D structure from a single image.
So: Canva = polished preset motion + easy audio sync. Generative AI tools = synthesized motion that can simulate camera moves, moving elements, or scene expansions. Both are useful: they just solve different problems.
Canva Free vs Canva Pro for video, what each includes
In short: you can make quick image-to-video clips on the Free plan, but Pro unlocks easier scaling and fewer export limits. From my tests and Canva’s help pages (see the official video help guide), including their video export and asset licensing guidelines the differences I noticed:
- Canva Free: access to basic animations, up to 1080p export in many cases, but some premium elements (stock footage, certain music tracks, and advanced templates) are locked. Exports may include restrictions for commercial use on premium assets.
- Canva Pro: additional animation styles, a larger stock library, brand kit, and easier background removal: generally faster workflow for multi-scene videos.
I wasn’t seeing a blatant watermark on every Free export during my test, that depends on whether you used Pro-only assets. Honest note: if you rely on built-in premium music or elements, expect paywalls or Pro requirements.
How to Turn an Image into a Video in Canva (Step-by-Step)
Turning a photo into a short video in Canva is straightforward. Below are the desktop and mobile methods I used, both worked but have slightly different feels.
Desktop method
- Start a new design and choose a video size (e.g., Instagram Reel 9:16) or click “Video” from the template list.
- Upload your image via the Uploads panel. I used a 4000×3000 photo and Canva handled it without complaint.
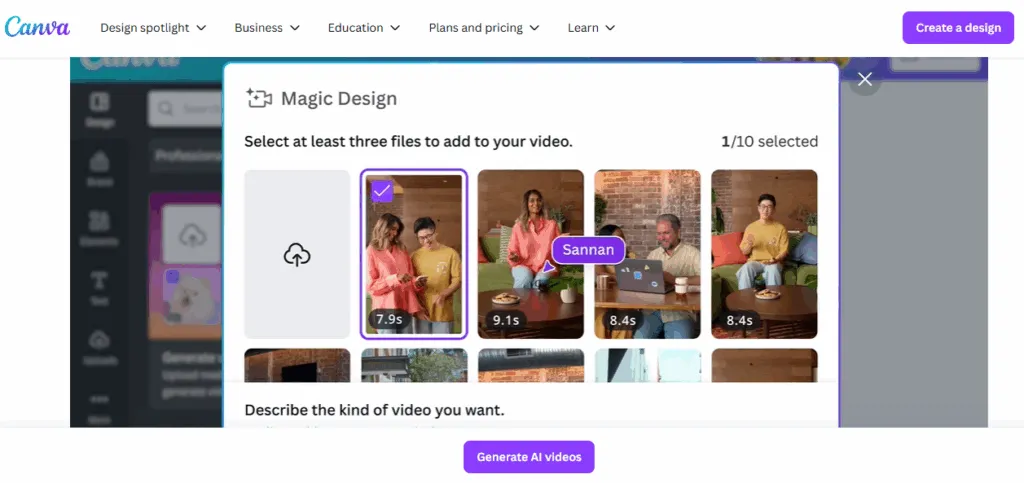
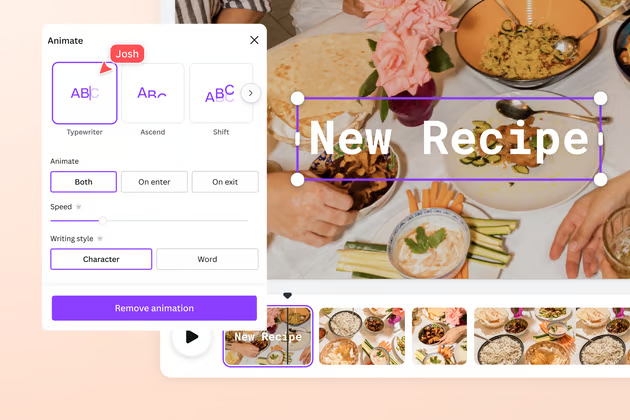
- Drag the image onto a blank page. Click the image, then select “Animate” from the top bar.
- Pick an animation preset, I tried “Pan,” “Pan & Zoom,” and “Block”. Adjust the intensity where available.
- Add a transition between pages if you have multiple images. Timing controls let you set page duration: I typically set 3–5 seconds per photo for social clips.
- Drop a music track from Canva’s audio library or upload your own. Use the timeline at the bottom to sync cuts or key moments.
- Export via Share → Download → MP4 video. Choose resolution and download.
My field note: the desktop timeline gives better control for trimming and timing. If you’re sequencing several photos, it’s easier to nudge timings precisely.
Mobile method
- Open the Canva app and pick a video template or tap the + to start from scratch.
- Upload or pick a photo from your camera roll.
- Tap the image and choose “Animate.” The same set of presets appears but with simpler UI controls.
- Tap “Audio” to add music and drag to align. Tap each page to set its duration.
- Export with the same Share → Download flow.
Mobile felt quicker for one-off reels, but precise timing and layering are easier on desktop. If you create videos on the go, the mobile app is excellent for rapid drafts.

Canva Free Tier Limits for Video Output
Canva is generous for casual creators, but there are a few practical caps to expect.
Resolution cap, watermark, export format
- Resolution: Canva supports common outputs like 720p and 1080p. In my recent tests, 4K export wasn’t available for free. If you need 4K, check Pro or the latest help docs.
- Watermark: Free accounts don’t automatically get a watermark on all videos, watermarks appear if you use Pro-only assets without licensing them. I saw that happen once when I added a Pro music clip and then tried to export it.
- Export formats: MP4 is the default and most reliable. Canva also offers GIF export for short loops, but GIFs lose audio and quality.
If you want consistently high-res, watermark-free exports without manual asset checks, Pro saves time. But for many social clips, Free is perfectly usable.
Where Canva Genuinely Falls Short
Canva is approachable, but there are honest limits that matter if you expect generative movement or advanced scene edits.
No motion generated from static scenes, presets only
If you feed Canva a photo with a person in front of a distant mountain, it won’t create a convincing foreground-background separation and animate them independently. As the Canva photo animation feature page makes clear the motion comes from presets applied uniformly, not from reconstructing depth or adding synthesized frames.
I tried exporting a 5-second clip with a simulated parallax look: it looked pleasant but obviously preset, the subject and background moved together. That’s fine for many use cases, but don’t expect cinematic parallax without manual multi-layer editing.
No AI scene interpretation
Canva doesn’t currently interpret scene semantics to add plausible motion or new content. It won’t, for example, animate a still dog to wag its tail or open a door that wasn’t in the photo. For behaviors like that, you’ll need a generative model trained to synthesize motion from single images.
Better Tools for True Image-to-Video AI
If your project needs synthesized motion, moving camera through a still scene, subject motion, or plausible scene expansion, consider dedicated AI tools. Below I pair suggestions with the use case where they shine.
Best for social media clips
Try tools that prioritize speed and mobile-friendly outputs: apps with single-image parallax generators and background motion. These are great when you want quick, eye-catching reels with convincing depth.
Best for product demos
For product close-ups that need simulated rotation or reveal, choose tools that allow multi-frame synthesis from a single photo and produce smooth intermediate frames. These work well for e-commerce GIFs or short demo videos.
Best if you need no watermark free
Some AI tools offer generous free tiers without watermarks for low-res outputs. If that’s critical, compare licensing and export terms carefully, “free” often hides limits on commercial use or quality.
I tested a couple of dedicated generators during March 2026 and found they could produce convincing camera moves, but they required more time to learn and sometimes cost more per export. Trade-off: better motion vs. more complexity and cost.
Canva vs Dedicated Image-to-Video Tools — Comparison Table
| Feature | Canva (Image-to-Video) | Dedicated Image-to-Video AI |
| Ease of use | Very high, templates and presets | Medium, steeper learning curve |
| Motion type | Preset animations (pan/zoom/transitions) | Synthesized motion, frame interpolation |
| Output control | Timeline, page duration, audio | Frame-by-frame control, depth maps |
| Free tier usefulness | High for social clips | Varies: some limit to low-res |
| Best for | Quick social content, slideshows | Cinematic movement, subject animation |
| Cost considerations | Free to Pro scale | Often pay-per-export or subscription |
This table captures my experience across several tests. Canva wins for speed and simplicity: dedicated tools win for realism and novel motion.
FAQ
Q: Can Canva turn a single photo into a 10-second cinematic video?
A: Yes, if you’re okay with preset pans, zooms, and transitions. For synthesized cinematic motion (e.g., subject moves independently), no, Canva doesn’t generate new frames from a single image.
Q: Will a Free Canva export always have a watermark?
A: Not always. Watermarks appear if you use Pro-only assets and haven’t licensed them. Purely free assets typically export without watermarks.
Q: Is there a way to fake depth in Canva?
A: You can manually cut a subject into layers and animate them separately to simulate parallax. It’s a manual workaround and takes time but improves realism.
Q: Where can I learn more about Canva’s video features?
A: Canva’s help center and the official video tutorials are a good starting point, search “Canva animate image” in their help docs for step guides and the latest updates.
Verdict: When to Stay in Canva, When to Switch
Here’s how I decide, now that I’ve spent a few afternoons testing things (notably March 12–14, 2026):
- Stay in Canva if: you need fast social clips, consistent brand templates, or simple photo slideshows with music. It’s low-friction and great for churn, I can produce an Instagram Reel in under 10 minutes.
- Switch to a dedicated image-to-video AI if: you need synthesized motion (camera traversal of a scene, independent subject movement), cinematic parallax, or advanced frame interpolation. Those tools give realism but demand more time and sometimes money.
Honestly, Canva is my go-to for 80% of everyday social and marketing tasks. When a project needs that extra cinematic touch, I’ll prep assets in Canva (for quick prototyping) and then move to a specialized tool for the final render.
Previous Posts: