
Leo here. Last month a client dropped a folder of TikTok clips in my lap and said “just clean these up for YouTube.” Translation: strip the burned-in captions, kill the username watermark drifting across the bottom corner, and make it look like the footage was never on TikTok in the first place. I said no problem — then spent two hours remembering that figuring out how to remove text from a video is one of those jobs that looks trivial until you actually open the file.
So here’s the honest version. What worked, what wasted my afternoon, the cleanest free routes, and the moment where you should stop fighting pixels and just rebuild the shot.
The 30-second answer: if the text sits on a flat, still background, AI fill can erase it cleanly. If it’s over motion, faces, or busy texture, you’ll fight smearing and flicker — and cropping, covering, or re-exporting from the original is usually the smarter move. There’s no one-click eraser that works on every clip. Anyone selling you that hasn’t run enough real footage through one.
Why Removing Text from Video Is Tricky
A photo is one frame. A video is hundreds. When you try to delete text in a video, the tool has to reconstruct whatever was behind that text — and then do it consistently across every single frame so the patch doesn’t jitter, flicker, or breathe. That’s the whole difficulty in one sentence.
On a static shot it’s manageable. The moment the camera moves or the background has detail, the tool has to invent plausible pixels that also stay glued to the motion. That’s where things fall apart.
Burned-in text vs editable captions
This is the first thing I check, every time, and it decides everything that follows.
If the text is still an editable layer — you added it in your editor and haven’t flattened the export — deleting it is a non-issue. Open the project, select the text layer, hit delete, re-export. Done in 30 seconds.
The pain only starts with burned-in (hardcoded) text — captions, subtitles, or watermarks baked permanently into the pixels. Now there’s no layer to delete. The text is the image. Everything below is about that harder case, because that’s the one people actually search for.
Remove Text on Common Platforms
TikTok and CapCut export limitations

Let’s clear up the most common confusion first, because I see it constantly. People want to know how to remove text from a TikTok video after they’ve already posted it. Short answer: you can’t do it inside TikTok. The app lets you edit your written caption (the description) for a limited window after posting, but on-screen text burned into the clip is locked the moment it exports. To touch those pixels, you have to leave the app entirely.
CapCut is the tool most creators reach for next, and it’s genuinely useful — with a caveat. If the captions were added inside CapCut as a subtitle layer, you can remove them directly; CapCut’s own guide to removing subtitles walks through covering, replacing, or auto-generating a clean version. But for text that was already baked into footage from somewhere else, CapCut doesn’t have a true content-aware fill for video. So figuring out how to remove text from a video in CapCut usually comes down to cropping it out, covering it with a sticker or blur, or feeding it to an AI step — not erasing it pixel-perfect.
When source files make removal easier
The easiest text removal is the one you never have to do. If you (or your client) still have the original project file, the master export without captions, or the raw footage before overlays were added — use it. Re-exporting a clean version takes minutes and looks flawless because nothing was ever reconstructed.
I now ask for source files before I quote a cleanup job. Half the time the “remove this text” request evaporates the second someone digs up the original.
Using AI Inpainting Tools
When there’s no clean source and you’re stuck with baked-in pixels, this is the real tool for the job — and the most reliable way to remove text in video footage that you can’t simply re-export. Inpainting is the technique behind every “AI text remover”: you mask the text, and the model fills the hole by sampling surrounding pixels and other frames, trying to reconstruct what should be there.
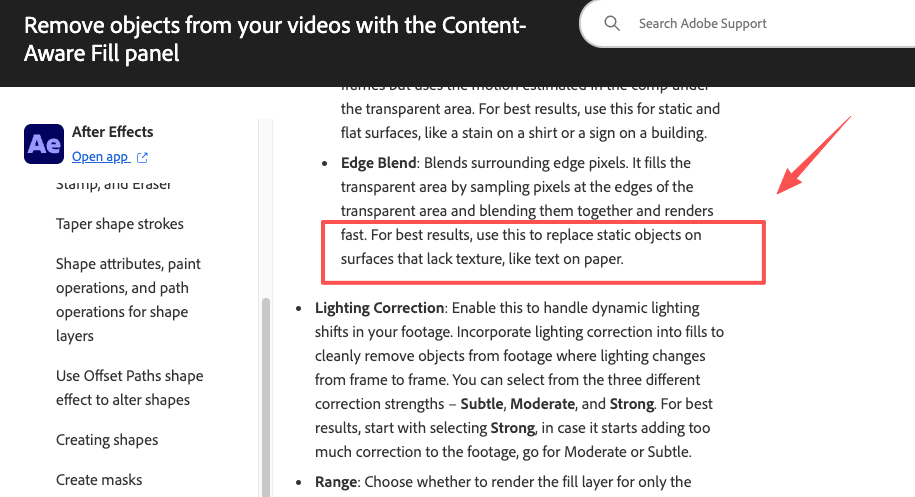
The professional benchmark is still Adobe’s Content-Aware Fill in After Effects. Adobe’s documentation for Content-Aware Fill is candid about where it shines: static objects on surfaces that lack texture, “like text on paper.” That’s not marketing hedging — it’s exactly the constraint that decides whether your result looks clean or cursed.
Best use cases for small logos, subtitles, and overlays
Inpainting earns its keep on the easy-but-tedious cases:
- A small static logo in a corner over a plain wall or sky.
- A subtitle bar sitting at the bottom of the frame over an out-of-focus background.
- A short overlay on a locked-off shot with no camera movement.
In those scenarios I’ve had results that genuinely look untouched. The pattern is always the same: small masked area, simple background, minimal motion.
When inpainting creates visible artifacts

Now the part the demos never show you. The hard cases are motion, faces, fine texture, and large text spanning the middle of the frame. A 2024 survey of video inpainting techniques lays out exactly why: patch-based methods work well on static backgrounds but struggle with dynamic scenes, and the real beast is temporal consistency — keeping the patch coherent frame to frame. Process each frame on its own and you get flickering, the classic AI-video tell.
I ran one client clip through an AI remover six times. Three results were clean. Three had a faint shadowy rectangle ghosting where the subtitle used to be, pulsing every time the background shifted. Same footage, same settings. Right now, prompt phrasing, mask tightness, and pure luck all still matter more than anyone admits. Budget for re-runs.
Free vs Paid Tools
What free tools usually limit
Plenty of free text removers exist, and for a small static watermark they’ll do the job. But the free tier almost always hides a tax somewhere, and it’s worth knowing where before you waste a render:
| Limit | What it looks like |
| Export watermark | They remove your text, then stamp theirs on the output |
| Resolution cap | Free exports locked to 720p, HD behind a paywall |
| Length / queue | 30–60 second cap, or you sit in a slow queue |
| Batch processing | One clip free; bulk handling is paid only |
My rule: prototype on the free tier to see if the removal is even possible on your clip, then decide whether the result is worth paying to export clean. Don’t spend an hour perfecting a mask only to discover the watermark-free download costs money.
Quality Limits and Rights Issues
Why watermark removal needs extra caution
Here’s where I get a little serious, because this part isn’t a quality question — it’s a legal one.
Erasing your own old branding, a watermark on footage you licensed, or a logo on content you have the rights to? Fine. Have at it. But stripping a watermark off someone else’s copyrighted clip to reuse it is a different thing entirely, and “I found it online” is not a defense. Under U.S. law, watermarks count as copyright management information, and the U.S. Copyright Office’s overview of the DMCA explains that knowingly removing or altering that information to conceal infringement is its own violation — separate from the infringement itself, with real civil and even criminal penalties attached.
So before you remove a watermark, ask one question: is this mine to remove? If the answer’s no, the cleanest tool in the world won’t keep you out of trouble.
Cleaner Alternatives
Re-export, crop, blur, or rebuild the scene
After enough of these jobs, I’ve learned that inpainting is often the last resort, not the first. Run down the easier options before you mask a single frame:
- Re-export from source — covered above, but it’s the gold standard. Always check first.
- Crop — if the text hugs an edge, a tight crop or a slight zoom can cut it out entirely with zero artifacts. You lose a little framing; you gain a clean shot.
- Cover or blur — a logo bug, a shape, or a blur patch over the text. Not invisible, but honest and instant, and great for repositioning your own branding.
- Rebuild the scene — when the text sits dead-center over detail and nothing else works, regenerating the shot can beat patching it. You can rebuild or re-edit the scene in an AI video agent like CrePal by re-cutting from clean footage or generating a fresh version through chat. To be clear, CrePal isn’t a one-click watermark eraser — it’s where you reconstruct or re-edit a clip instead of fighting to repair damaged pixels. Different job, often a cleaner result.
Think of it like a stain on a shirt. Sometimes you can spot-clean it. Sometimes it’s faster to just flip the fabric. Removal isn’t always the smart move — replacement is.
FAQ
How to remove text from TikTok video after it’s already posted?
You can’t remove burned-in text directly inside TikTok. The platform only lets you edit the caption/description for a short time after posting. Most creators download the video and use external tools like CapCut, Runway, or AI inpainting software to mask and fill the text area. For best results, try to get the original project file from the creator instead of working with the exported version.
How to remove text from a video in CapCut?
If the text was added as a subtitle layer inside CapCut, simply select and delete the layer, then re-export. For baked-in text from another source, use CapCut’s “Remove Object” or “AI Inpaint” tool: mask the text area, let the AI fill it, and preview frame-by-frame for flickering. Many users combine this with manual blur or overlay patches for cleaner results on moving backgrounds.
Does AI inpainting actually work well?
It depends almost entirely on one thing: is the background behind the text static or moving? Still, simple background — it works shockingly well. Moving camera, faces, or fine texture — expect ghosting and plan to re-run it a few times. It’s a real tool, not magic, and the gap between those two outcomes is enormous.
What’s the easiest way to remove text from a video for beginners?
For simple cases, use CapCut’s built-in remove object tool or browser-based AI removers. Upload the clip, brush over the text, and let the AI fill the area. For better control, many beginners export to desktop tools like Runway or Topaz and use their inpainting features. Always preview the entire clip because static masks often fail on motion.
That’s the whole map. The thing I’d burn into your memory: knowing how to remove text from a video is less about finding one perfect tool and more about reading the clip first — editable or baked-in, static or moving, yours or someone else’s. Get that read right and you’ll pick the easy path nine times out of ten.
Next time you’re stuck with a captioned clip, try the boring fixes before the clever ones. Hunt for the source file, try a crop, and only reach for inpainting when there’s genuinely no shortcut. If you’ve got a removal horror story — the watermark that wouldn’t die, the AI fill that flickered — drop it in the comments. I collect those.
Previous posts: