Hey guys, Dora here. I nearly missed a client deadline because I spent two hours on Midjourney hunting for the right style — and still didn’t get it. Then I opened Leonardo AI on a whim, typed the same prompt, and got something usable in under four minutes.
That was the moment I stopped treating Leonardo as a “nice backup” and started actually learning it. If you’re a creator who keeps hearing about this tool but hasn’t gone deep yet, this is the guide I wish I had when I started. I’ll walk you through everything — account setup, model selection, the settings that actually matter — plus the stuff nobody talks about, like which models chew through your free tokens faster than you expect.
What Is Leonardo AI
Leonardo AI is a web-based image generation platform that’s been quietly building one of the most creator-friendly toolsets in this space. It started around 2022 with a focus on game asset production — which explains why it’s so good at consistency and style control — and has since grown to over 18 million users. In mid-2024 it was acquired by Canva, which means it’s now part of a much bigger creative ecosystem.
But here’s what actually matters for most of us: it’s not just a “type prompt, get image” tool. It’s closer to a full creative workshop — you get a canvas editor, multiple generation models, custom model training, real-time sketching, and motion/video generation all in one place. The interface is a lot to take in at first. Think less “Instagram for AI images” and more “cockpit for power users.”
That said — even as a casual user, the free plan alone is genuinely useful. Which brings me to the most common question I see.
Is Leonardo AI Free? Plans and Limits Explained
Yes, it’s free. And not “free trial, then they immediately annoy you to upgrade” free. The free tier gives you 150 fast tokens daily — and those reset every single day. That works out to roughly 150 standard images, 75 high-res generations, or 3–6 short motion video clips per day depending on settings. For casual creators or anyone just testing, that’s more than enough.
Leonardo is best understood as a public daily playground rather than a tool with a clean “X images per day” promise — token cost varies by what you do, not just how many images you generate. This tripped me up early. I ran out of tokens faster than expected because I kept using the Alchemy enhancement layer, which costs 4–8x more tokens per image.
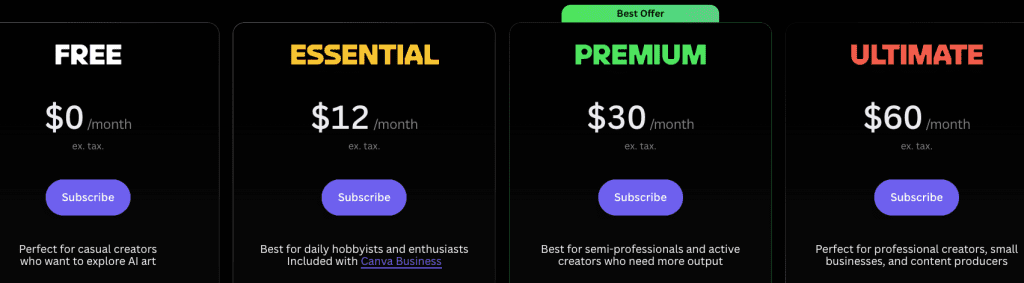
Here’s the accurate breakdown of the plans as of April 2026
| Plan | Monthly Cost | Fast Tokens | Token Bank Capacity | Private Generations |
| Free | $0 | 150 / day | 150 | ❌ Public only |
| Essential | $12 | 8,500 / month | 25,500 | ✅ Yes |
| Premium | $30 | 25,000 / month | 75,000 | ✅ Yes |
| Ultimate | $60 | 60,000 / month | 180,000 | ✅ Yes |
The Essential plan at $12/month is the sweet spot for most creators — you get priority speed, private generations, and enough tokens for consistent daily work.
Quick reality check: images created on the free plan are public by default, and you get full commercial rights even on the free tier. So if you’re generating content just for yourself and don’t mind it showing up in the community gallery, the free plan goes further than you’d think.
How to Get Started with Leonardo AI
Account Setup
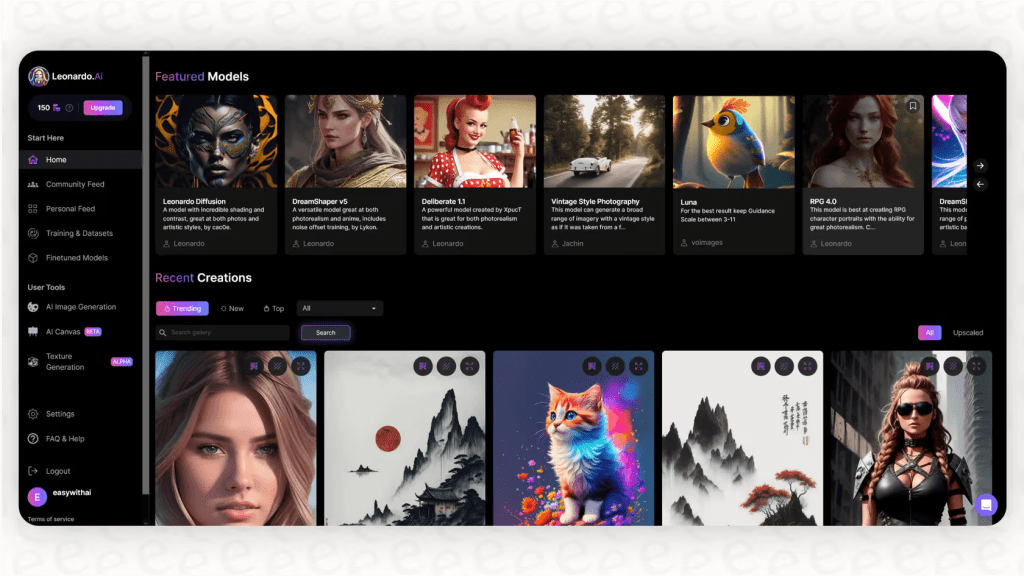
Go to leonardo.ai and sign up with your Google account or email. It takes about 90 seconds. Once you’re in, you’ll land on the home dashboard — it’s busy, but don’t panic. The main area you want is Image Generation in the left sidebar.
Before you touch anything, spend 5 minutes in the community feed. Seriously. Look at what other people are generating, click on an image you like, and pay attention to the model they used and the settings they set. This is the fastest way to learn what each model is actually good for.
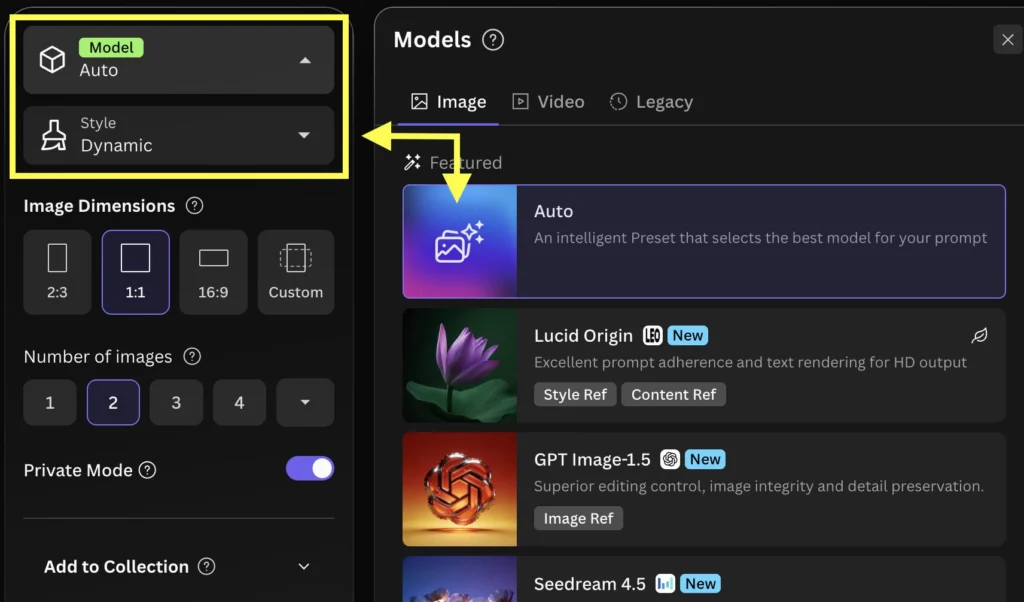
Choosing a Model
This is where Leonardo separates itself from the pack — and also where most beginners get confused. When you open the Image Generation view, there’s a model selector at the top. You’ll see a grid of options with names like Phoenix, Flux Dev, Flux Schnell, Kino XL, and more. Each one has a very different personality.
Flux Dev and Flux Schnell are both developed by Black Forest Labs, founded by the original team behind Stable Diffusion — which is why the output texture and rendering philosophy feel distinct from Leonardo’s in-house Phoenix model.
Here’s what I actually use and why:
- Phoenix 1.0 — developed internally by Leonardo, this is their foundational model built specifically for prompt adherence. It consistently ranks high in benchmark tests for accurately following complex, multi-subject prompts. I reach for this when I have a specific, detailed prompt I need followed precisely.
- Flux Dev — my go-to for photorealistic images. Flux Dev delivers photorealistic, detail-rich images suited for professional applications like marketing, branding, and digital art.
- Flux Schnell — fast and cheap (token-wise). Think of Flux Schnell as your digital sketchpad.
- Kino XL — for anything cinematic. Dramatic lighting, moody compositions, scenes that feel like frames from a movie.
Generating Images: Step-by-Step
Prompt Writing Tips
Okay, this is where most people give up too early. A weak prompt gives you a weird image, you think the tool is bad, and you leave. I’ve been there. Here’s what actually works:
Be specific about what you want, not just what the image is. Instead of “a woman in a forest,” try “a woman in her 30s, looking upward, standing in a dense misty forest at dawn, soft golden backlight, cinematic composition, photorealistic.” The model isn’t guessing anymore — it’s following instructions.
Mention the style explicitly. “Photorealistic,” “concept art,” “flat vector illustration,” “oil painting style” — these do a lot of heavy lifting. Don’t assume the model will pick the aesthetic you have in your head.
Add negative prompts. In the settings panel there’s a Negative Prompt field. Use it: “blurry, low quality, extra limbs, watermark” cuts out a lot of the garbage outputs.
One thing that genuinely impressed me: Phoenix handles multi-object prompts remarkably well — I gave it “a cat wearing a red hat, blue boots, holding a green apple, standing on a purple rug” and it separated the concepts correctly, while most other models mix up the colors. For client work where details can’t be random, that matters a lot. You can cross-check how different models handle prompt adherence using Hugging Face’s open image generation leaderboard, which aggregates third-party benchmark scores across dozens of models — it’s the closest thing we have to a neutral scoreboard.
Settings That Matter
Aspect Ratio — set this before generating, not after. Most platforms let you crop later but Leonardo’s composition works better when you give it the right canvas shape upfront. For Instagram posts: 1:1. For YouTube thumbnails: 16:9. For Pinterest: 2:3.
Number of Images — generate 4 at a time when exploring, 1 at a time when you’ve nailed the prompt and just need variations. This keeps token usage sane.
Alchemy — this is Leonardo’s enhancement pipeline. It adds a refinement pass that genuinely improves lighting, detail, and sharpness. The catch: Alchemy costs roughly 8–16 tokens per image versus 2 tokens without it. I only turn it on for final renders, not exploration.
Guidance Scale — this controls how closely the model sticks to your prompt. Low guidance (2–4) gives you more creative freedom but drifts from the prompt. High guidance (7–10) follows the prompt tightly but can feel stiff. I usually stay around 6–7 for most work.
Best Leonardo AI Models for Different Use Cases
I’ve tested a lot of these through actual client projects — thumbnails, blog headers, social content, product mockups. Here’s my honest take by use case:
Marketing and social content → Flux Dev or Phoenix. The realism on Flux Dev is hard to argue with for product imagery. Phoenix for anything where text appears in the image.
Game assets and concept art → Phoenix is the clear winner here. It excels at creating flat illustrations, vector-style stickers, and game assets where the layout needs to match your prompt precisely.
Cinematic thumbnails → Kino XL. Pair it with a moody prompt and you’ll get dramatic hero shots faster than anywhere else I’ve tried.
Rapid ideation → Flux Schnell, always. It’s not the prettiest output but it’s cheap and fast, which is what you need when you’re still figuring out the concept.
Character consistency across multiple images → use the Character Reference feature in the Image Guidance tab. Upload a reference face or character design, and the model tries to maintain that likeness across new prompts. It’s not perfect, but it’s miles ahead of trying to describe a character in words alone.
Leonardo AI vs Midjourney vs Stable Diffusion
I want to be honest here rather than just cheerleading. Midjourney still wins on raw aesthetic quality for one-off art pieces. Stable Diffusion — the approach originally introduced by Rombach et al. at LMU Munich, which moved heavy computation into a compressed latent space — requires technical setup when running locally but gives you full control. Leonardo AI sits in the middle: more control than Midjourney, more accessible than local SD, and a free tier that’s actually useful.
Where Leonardo loses: generation speed can be 15–90 seconds depending on mode.
Known Limitations
Hands and complex inorganic objects still need multiple tries. Very complex prompts can hallucinate. Free plan generations are public. Some advanced features (like certain inpainting) require paid plans.
Who Leonardo AI Is Best For
After using this tool across dozens of projects, here’s my honest breakdown:
Go all-in on Leonardo if:
- You need consistent character or style across multiple images
- You’re creating game assets, concept art, or detailed illustrations
- You want a free daily allowance to actually build a creative habit
- Prompt control and iteration matter more than effortless aesthetics
It might not be your primary tool if:
- You want the fastest path to a beautiful image with minimal setup — Midjourney is still better for that
- You need to generate hundreds of images a day at scale (the credits system gets expensive)
- You need hyper-precise typography inside images — Phoenix is good but dedicated design tools are still cleaner for text-heavy work
For creators like me — producing thumbnails, social assets, mock-ups for content pitches — it covers about 80% of what I need without touching a paid plan most weeks. The other 20% I still route through other tools depending on the specific job.
Where to Start Right Now
If you’ve been meaning to try this and keep putting it off: just make the account. The free plan asks for nothing — no credit card, no trial period. Log in, go to Image Generation, pick Flux Schnell to start cheap, and type something you’d actually want to create. Give it 10 minutes.
What usually happens is you generate a few mediocre images, then accidentally get one that surprises you, and suddenly you’re still there an hour later experimenting with the guidance scale. That’s the real tutorial.
I’ll keep using Leonardo for most of my image work — especially on weeks where I need a lot of volume without the credit card anxiety. It’s not perfect, and it won’t replace Midjourney for every use case. But for what it is — a genuinely free, genuinely capable creative studio — it’s one of the more honest tools I’ve come across in this space.
FAQ
Q: Does Leonardo AI have an app? There’s a web app that works well on mobile browsers, plus iOS and Android apps. The desktop web interface is where all the advanced tools live though — the mobile app is good for quick generations and browsing, not for detailed editing sessions.
Q: Why are my images going public? If you’re on the free plan, all generations are added to Leonardo’s public community gallery by default. Private generations require the Apprentice plan or above.
Previous Posts: