Hi, Dora here. Someone posted an image in our group chat a few weeks ago — moody cinematic framing, this specific blue-gray color grade, shallow depth of field. I stared at it longer than I’d like to admit, then tried to recreate it from scratch and produced something that looked like a completely different aesthetic universe.
That’s the problem with starting from scratch every time. You can see exactly what you want — it’s right there in front of you — but translating a visual back into words precise enough to regenerate it is harder than it sounds.
That’s where image to prompt AI tools come in. I spent a few days testing the main ones, not to find a magic reverse-engineering button (that doesn’t exist — more on this shortly), but to build a workflow that actually gets me from “reference image” to “usable prompt” without wasting an afternoon guessing.
Quick answer: The fastest path is CLIP Interrogator for tag-style output, GPT-4o for natural language descriptions. Neither gives you the original prompt — they give you a starting point you’ll edit. That’s still genuinely useful.
What Image-to-Prompt AI Does
Feed it an image, get back a text description detailed enough to generate something visually similar. That’s the pitch.
What’s actually happening is that most of these tools use vision-language models — things like CLIP or BLIP — trained to match visual features to text. They’re not reading hidden metadata or reverse-engineering a diffusion model’s internal computation. They’re describing what they see, in the vocabulary their training data gave them.
That distinction matters: the output reflects the model’s visual vocabulary, not the original creator’s intent. An ai image description generator built on CLIP will lean toward photography and illustration tags; GPT-4o will give you more natural sentence structure. Neither is wrong. They’re just different starting points.
What they’re good at: subject matter, lighting quality, color palette, texture, style reference. What they’re inconsistent on: abstract mood, narrative context, and model-specific syntax (tags that only work in one generator).
Best Tools
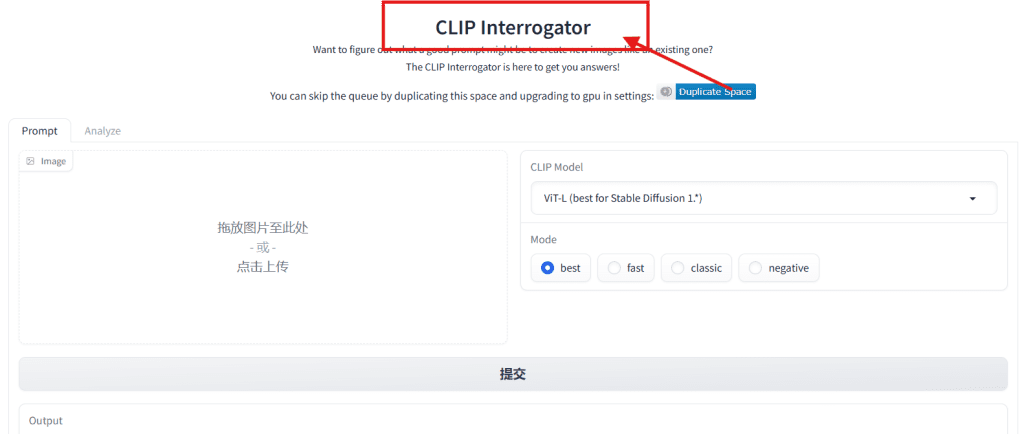
CLIP Interrogator
The go-to for Stable Diffusion and Flux tag-style prompts. CLIP Interrogator on Hugging Face is free in the browser — upload an image, pick fast or best mode, get a comma-separated list of descriptors back.
Output looks like: cinematic lighting, desaturated, 35mm, shallow depth of field, film grain, editorial photography, soft shadow. Good raw material for SD-style and Flux workflows. For flux ai image to prompt use specifically, this tag output is a solid base — just convert it to natural language sentences before running, since Flux responds better to written descriptions than raw tag chains.
Known caveat: tag-style output doesn’t work well in natural-language-first generators like GPT-image or DALL-E 3. You’ll need to restructure it.
img2prompt
Also on Hugging Face — img2prompt is tuned specifically for Stable Diffusion–style prompt generation. Faster than CLIP Interrogator’s “best” mode, output quality is comparable for most use cases. Worth having opened in a second tab when you want a quick second opinion.
GPT-4o Vision
The most flexible option for natural language output. With OpenAI’s vision API or ChatGPT Plus, you can ask explicitly: “Describe this image as a detailed prompt I’d use in a text-to-image generator, focusing on lighting, color treatment, and style — not subject matter.” You get structured prose that works well in natural-language generators.
More flexible than CLIP Interrogator. Not free. Slower if you’re batch-processing. Worth it when output quality matters more than speed.
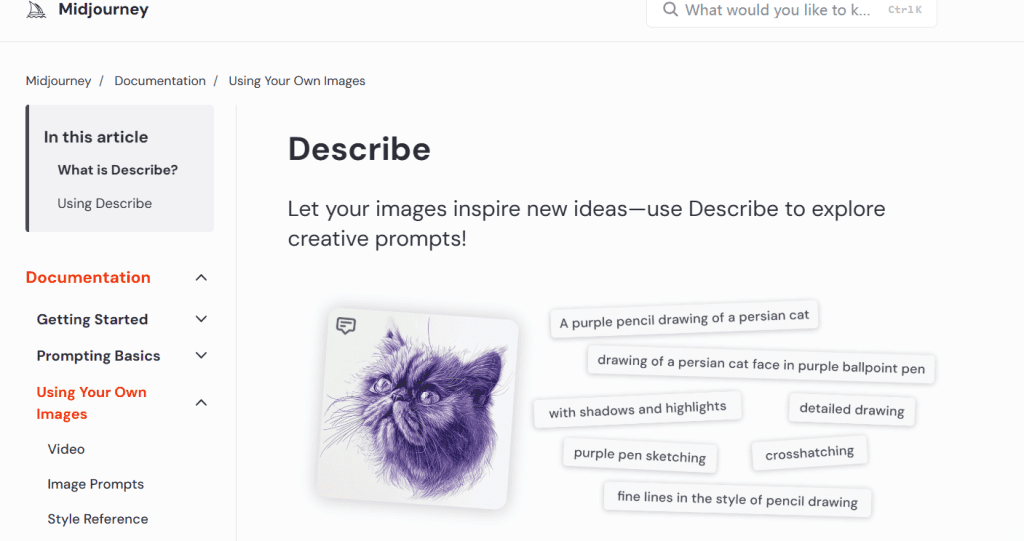
Midjourney /describe
If Midjourney is your destination, the native /describe command is the native solution. Upload an image, get four prompt variations back, pick the one that matches. Because it’s trained on Midjourney’s own output vocabulary, the extractions tend to work better in Midjourney specifically than prompts from generic tools.
How to Extract Better Prompts
Most people drop a complex image in, paste the 40-word output directly into a generator, and wonder why the result looks nothing like the reference. A few adjustments that actually change the output quality:
Crop before you extract. If you want the lighting and color treatment from a photo — not the subject — crop to a patch that represents those qualities: a sky section, a background texture, a skin tone sample. The extraction tool focuses on what’s in the frame. Smaller, more focused crop = more specific output.
Run the same image through two tools. CLIP Interrogator for tags, GPT-4o for natural language. Cross-reference them. Tags that appear in both outputs are usually the ones that genuinely define the image’s visual identity. Tags that only appear in one are noisier — weight them less.
Tell GPT-4o exactly what format you need. “Describe this as a prompt in natural language, focusing on lighting, color palette, and visual style” gives you something more usable than “describe this image.” The model follows specific instructions well. Use that.
I ran a moody editorial portrait through both CLIP Interrogator and GPT-4o. The outputs were noticeably different — CLIP leaned heavily into photography tags, GPT-4o gave me a paragraph with stronger style language. The best final prompt was a 5-minute merge of both. Still faster than starting from scratch by a significant margin.
How to Use Prompts for Images and Video
For static image generation, the extracted prompt is usually usable after cleanup (more on that next). The workflow is: extract → clean → paste → iterate.
For video, the process shifts. Most image to video prompt generator workflows — Runway, Kling, and similar platforms — don’t just want a static image description. They want motion context: camera direction, subject action, and what’s staying still.
A prompt that generates a great still (“cinematic portrait, soft diffused light, muted tones, film grain”) needs to become a scene direction for video: “slow push-in toward subject, soft diffused light, muted color palette, no subject movement, background depth.” That’s a different kind of writing, and it’s where most people get stuck.
The image-to-video workflow I’ve settled on:
- Extract visual style with CLIP Interrogator or GPT-4o
- Add motion language: camera move, subject action or deliberate stillness
- Specify what’s NOT moving — this stabilizes generation in most platforms
- Test at 4 seconds before committing to a longer run
I used this process to match a reference still for a short reel on Runway. First 4-second pass was roughly 80% of the way there in visual style. One prompt revision got it close enough to use. The whole loop took under 20 minutes, which beats the “guess and generate” approach by a lot.
Common Cleanup Steps
Even good picture to prompt writing output needs editing before it generates something usable. Here’s what I consistently fix:
Remove contradictions. CLIP Interrogator sometimes outputs conflicting descriptors in the same prompt — “dark moody lighting, bright vibrant colors” is a real example I’ve seen. Models don’t resolve contradictions well. Pick one direction and cut the other.
Strip legacy quality boosters. Tags like “masterpiece, award-winning, best quality, highly detailed” are holdovers from older Stable Diffusion workflows. They do nothing in most modern models and can actually muddy the output. Cut them by default.
Front-load what matters. Most generators weight early tokens more heavily. Put the most important style descriptors first: lighting, color treatment, camera/lens characteristics. Subject specifics can come after.
Convert tags to sentences for natural-language models.soft rim light, 85mm, shallow depth of field, film grain → “Shot on 85mm with shallow depth of field, soft rim lighting and fine film grain visible.” Takes 30 seconds. Improves output noticeably in any model that prefers natural language input.
The cleanup step isn’t optional if you want consistent results. It’s 5–10 minutes that determines whether the image prompt generator output actually works or just kind of points in the right direction.

FAQ
How do I turn an image into an AI prompt?
Upload it to an extraction tool — CLIP Interrogator, img2prompt, or GPT-4o are the most practical options right now. The tool analyzes visual features and returns a text description. Run cleanup on the output (remove contradictions, strip filler tags, reorder by priority) before using it as a prompt. The result is a starting point, not a final prompt.
Can image-to-prompt tools recover the exact original prompt?
No. These tools describe what they observe in the image — they’re not reverse-engineering the specific prompt used to create it. Two images generated from the same prompt can produce different extractions. Treat the output as a useful approximation, not a recovered recipe. The goal is to capture the visual character well enough to generate something similar, not identical.
Which tools work best for extracting style from an image?
For tag-based style extraction (Stable Diffusion, Flux): CLIP Interrogator. For natural language output (DALL-E, GPT-image, Midjourney): GPT-4o or Midjourney’s /describe command. For speed and zero cost: img2prompt on Hugging Face. The right choice depends on which generator you’re feeding the prompt into — match the output format to the input format your model prefers.
How can I use an image prompt for video generation?
Extract the visual style first, then add motion language before using it as an image to video prompt generator input. Add camera movement, subject action (or explicit stillness), and temporal context. Most video platforms respond better to scene direction language than static image descriptions. Test on short clips (4 seconds) before committing to longer runs. Runway and Kling both work with this approach.
Image to prompt AI tools are useful. They’re also consistently oversold as automatic solutions. The extraction step is fast — the thinking step still takes a few minutes.
What you actually get: a strong starting point that would’ve taken you 20 minutes to write from scratch, compressed into 30 seconds plus a cleanup pass. That’s a real time saving. Just don’t skip the cleanup, and don’t expect the output to drop straight into your generator without editing.
What reference images have you been trying to reverse-engineer? Drop them below — I’m curious which visual styles the tools handle well and where they’re still falling short.
Previous Posts