I was supposed to be done with work by 9 PM.
Then a client texted asking for “a few quick mockup directions” for a skincare launch — hero shot, two lifestyle variants, packaging close-up. The kind of job that used to mean either a half-day Photoshop session or a $300 freelance request with a 48-hour turnaround.
Hey everyone, it’s Dora. I test AI image and video tools the moment they drop, and I write about what actually works in real creative workflows — not just demos.
So I ended up going down a rabbit hole with GPT Image 2 instead.
Two hours later, I had 14 usable mockup directions, one of which the client used almost straight. No Photoshop. No back-and-forth.
If you haven’t put GPT Image 2 through its paces for product work yet — this is the breakdown I wish I’d had before I started.
What GPT Image 2 Can Do for Product Mockups
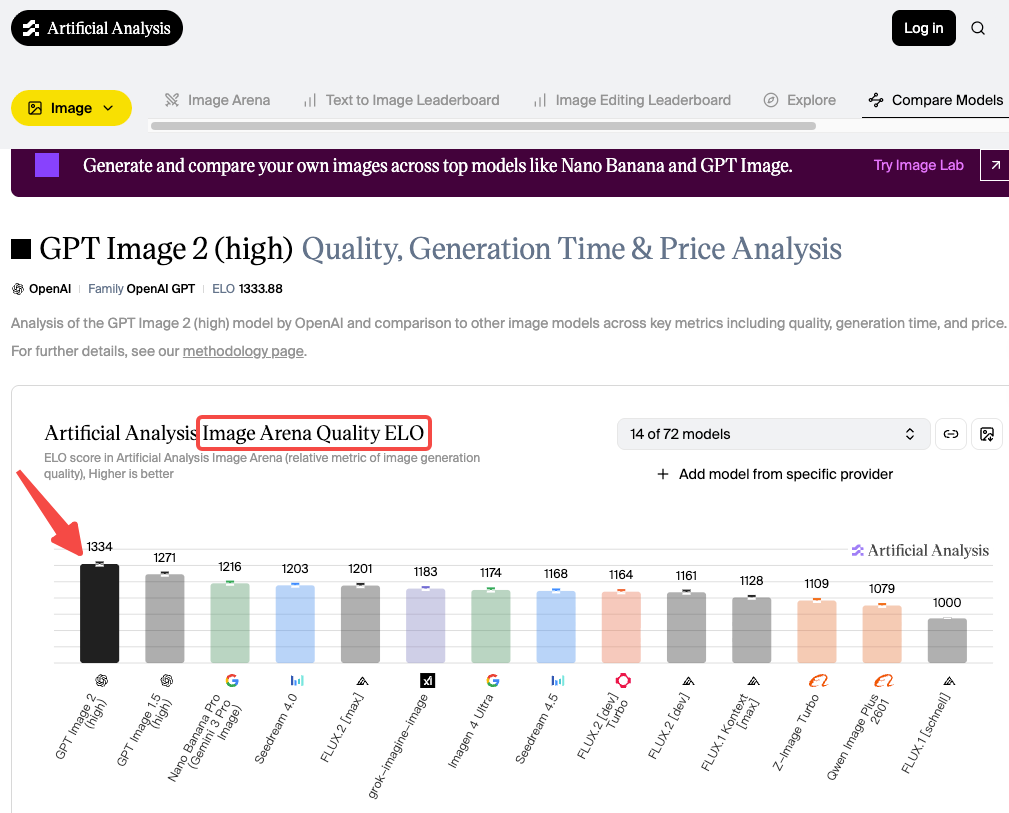
Let’s get the headline out of the way: the biggest reason this model matters for product work is that it finally renders text correctly. OpenAI launched GPT Image 2 on April 21, 2026, describing it as their most capable image generation model — and the jump in text accuracy is real in a way that previous announcements weren’t. We’re talking product labels, callout text, SKU lines — readable, spelled correctly, placed where you asked. The numbers back this up. GPT Image 2 scored 1,334 on the Image Arena leaderboard.
I’ve tested a lot of image models over the past couple of years. Most of them could nail a pretty lifestyle shot but completely fell apart the moment a label or headline needed to be legible. Packaging mockups were basically useless because the model would hallucinate your brand name into something close-but-wrong. That would then need a manual Photoshop pass, which erased most of the time savings.
GPT Image 2 is different. It doesn’t just generate a product that looks like it has a label — it generates a product with the actual text you specified. For ecommerce creators and small marketing teams, that’s a real workflow unlock for GPT Image 2 ecommerce images and rapid iteration.
Here’s what I’ve found it genuinely useful for:
- Packaging concepts — matte pouch, glass jar, kraft box, tube, bottle, with your brand name and descriptor line rendered accurately
- Hero shots — isolated product on white, studio-lit, at whatever aspect ratio your listing requires
- Lifestyle scenes — product placed in a styled environment (countertop, shelf, flatlay, hands-on use)
- Color variants — same SKU, different colorways, generated in one batch within a session
- Packaging copy changes — swap the flavor name, scent, or edition label across variants without regenerating from scratch
What it’s not going to do: replace a final production shoot. But for concept validation, pre-launch social content, and rapid variant generation? Genuinely fast.
What You Need Before You Start
Product Photos, Brand Inputs, and Ratios
Quality in, quality out. Vague prompts give the model too much creative latitude.
Reference images. Per the official image generation guide, GPT Image 2 accepts up to 16 reference images as input. Upload your actual product photo or existing packaging — the model works from it and introduces far less variability than prompting cold.
Your exact label text. Write it out exactly as it should appear, and put it in quotes inside your prompt. “Golden Grove Raw Honey, 340g” comes out as “Golden Grove Raw Honey, 340g.” That specificity is what makes this model different.
Aspect ratio. GPT Image 2 supports ratios from 1:3 to 3:1, output up to 2K resolution. Amazon main images want 1:1. Instagram feed wants 1:1 or 4:5. Stories want 9:16. Specify upfront — don’t generate landscape and crop later.
Lighting and surface notes. “Clean white background, studio lighting, soft shadow below” is enough to get a solid ecommerce hero shot. “Marble countertop, natural window light, morning setting” steers a lifestyle scene in the right direction. The more specific the scene parameters, the less the model improvises.
Step-by-Step Workflow for Product Visuals
Hero Shots and Lifestyle Scenes
This is the most straightforward use case, and honestly where GPT Image 2 earns back its time cost the fastest.
OpenAI’s image model prompting guide recommends structuring prompts as: background/scene → subject → key details → constraints, and that order genuinely matters. For a hero shot, my starting structure looks like this:
Product mockup of [product name]. [Brief packaging description — material, color, shape]. Label reads “[exact text]”. Clean white background, studio lighting, soft shadow below. Square format, product centered, filling 80% of frame.
That usually gives me a solid first result. If the product shape is unusual, uploading a reference photo alongside anchors the model better than description alone.
For lifestyle scenes, I add the environment:
[Product name] placed on a [surface description]. [Scene context — morning light, plant nearby, etc.]. Editorial photography feel, warm tone. Vertical format.
The thing that trips me up every time: be specific about scale. The model will sometimes generate a product that looks oddly small or large in a lifestyle scene. Adding “the product takes up roughly 40% of the frame, positioned slightly left of center” fixes most of it.
Color Variants and Packaging Changes
This is where I’ve saved the most cumulative time. If you’re launching multiple SKUs — same product, different flavors or scents or editions — GPT Image 2 can generate a cohesive set from one base prompt, worked iteratively within a single session.
The trick: generate your strongest base image first, then iterate conversationally. You can say “now generate the same packaging in a deep navy colorway with the label reading ‘Midnight Mint'” and the model carries forward the composition, lighting, and style from the previous result.
I generated five color variants for a candle launch this way in about 20 minutes. Two needed a second pass to tighten label positioning, but the consistency across the set was solid enough for client concept review without any additional processing.
One hard constraint worth knowing: close the session and open a new one, and that style consistency resets. The model has no memory between separate conversations. For anything requiring a matched set, work the whole batch in one session, or save your base prompt as a template to recreate the starting point next time.
Review Claims, Labels, and Details
Here’s the part I want you to actually stop and read, because this is where people get burned.
GPT Image 2 renders text well. That is not the same as GPT Image 2 verifying text. The model renders what you typed — but it will occasionally introduce small variations, especially in longer label copy, multi-line text, or fine print at a small visual size.
Things I check every single time before using any output in a live context:
- Brand name spelling — every time, even if it’s short
- Numerical values — net weight, volumes, measurements can drift subtly
- Ingredients or claims — if you included any, read them character by character
- Small print — anything rendered at a small visual size carries higher error risk
The workflow is: AI generates, human reviews, human approves. That’s the correct loop for anything customer-facing — not a knock on the model, just responsible production.
Limits, Risks, and Production Trade-offs
Cross-session consistency is unsolved. If you need images that clearly belong to the same campaign set, work in one session or accept variability and fix in post.
Complex logos are hit-or-miss. Detailed mascots or fine-linework logos get approximated, not reproduced. Fine for concepting, not for a final approved brand system.
Content policy applies. Health claims, supplement labels, anything regulatory — the model may decline or behave inconsistently. Check OpenAI’s usage policies before building a workflow around sensitive product categories.
It’s pre-production, not final. For anything where label accuracy has legal implications, human review isn’t optional.
I use GPT Image 2 at the concept stage, then hand off to a designer for finals. The savings are real: I’m not commissioning three packaging directions blind; I’m commissioning one, informed by six concepts the client already responded to.
Best Alternatives for Stricter Mockup Needs
Figma — precise layout control, real brand typography, pixel-level review. If the mockup is going into a design handoff, Figma is still the standard.
Canva or Adobe Express — template-based mockups placing a real product photo into a preset scene. Less generative flexibility, more predictable output for established assets.
Midjourney — stronger stylistic range, more expressive aesthetic. GPT Image 2 skews clean and editorial; Midjourney goes weirder in ways that sometimes serve creative campaigns better.
Actual product photography — for final commercial assets requiring accurate color reproduction or physical spec matching. AI mockups are for the concept phase.
FAQ
Can I use these mockups for actual ecommerce listings? For primary product images, treat them as placeholders while you get real photography done, or use them for secondary lifestyle shots. Check each platform’s terms — disclosure requirements around AI-generated assets are evolving.
How do I keep the product consistent across multiple images? Work in one session and iterate from your strongest base result. Closing and reopening resets the model’s style context.
Does it handle non-English text on packaging? Yes — one of its strongest suits. Text accuracy holds across CJK (Chinese, Japanese, Korean), Hindi, Arabic, and Bengali for short label copy, which wasn’t reliably possible on any major model before this.
What does it cost? ChatGPT Plus ($20/month) includes GPT Image 2 with Thinking mode. Via API, a 1024×1024 image runs $0.006 at low quality to $0.211 at high quality — full breakdown on OpenAI’s pricing page. For most mockup workflows, ChatGPT is the lower-friction starting point.
What if label text comes out slightly wrong? Re-prompt in the same session: “The label reads [exact text] — keep everything else the same.” Wrapping the exact string in quotation marks inside your prompt also improves fidelity on stubborn copy.
Conclusion
GPT Image 2 is genuinely useful for the front half of a product mockup workflow — concept validation, variant exploration, pre-launch social content. It compresses what used to be a two-day back-and-forth into an afternoon. For indie creators and small teams moving fast without a retainer designer, that compression matters.
But it doesn’t eliminate the human review step on anything that counts. Label copy, claims, specs — read them every time. And it doesn’t replace final production photography when you need controlled color accuracy and precise brand rendering.
Use it for what it’s good at. Hand off what it’s not.
I keep my ChatGPT window open for basically all early-stage visual work now. Whether that’s the right call for your workflow depends on what “fast” costs you versus what “perfect” costs you.
For a lot of the work I do, fast wins.
Previous Posts: