Last Tuesday I burned through about 40 credits on Kling trying to make a still product shot “rotate slowly with soft lighting,” and the headphones grew a third earcup halfway through. That’s the kind of thing nobody warns you about before you start using Kling AI image to video — so this is the post I wish I’d had a year ago.
Leo here. I’ve been running client jobs through Kling since the 1.6 days, and I keep coming back because, frankly, nothing else animates a still image quite as convincingly. But the gap between “I uploaded a photo and typed something” and “this actually looks usable” is bigger than most tutorials admit. So here’s what I’ve actually learned — what works, what wastes credits, and where the model still falls apart.
What Kling Image-to-Video Actually Does
Image-to-video takes your photo and adds motion to it while keeping the composition, lighting, and identity of the original. Think of it less as “generate a video” and more as “breathe life into this exact frame.” That’s the opposite of text-to-video, where Kling builds the whole scene from scratch based on your description.
Kuaishou — the company behind Kling — has been iterating fast. According to Kling AI’s stable release history, version 3.0 arrived in February 2026, and it brought a unified architecture that handles video, image, and multi-shot generation together, with output up to 4K resolution and clips up to 15 seconds. That’s a real jump from where things were a year ago.
Best use cases for animating still images
In my experience, image-to-video shines for three things: product shots (rotating, gentle zooms), portrait or character animation (subtle head turns, breathing, hair movement), and scenic stills (drone-style push-ins on landscapes or architecture). It’s weaker for anything involving multiple people interacting — more on that later.
Getting Started
Okay, setup. This part is genuinely simple, which is rare for AI tools.
Head to klingai.com, navigate to Image-to-Video, and upload your source image — that’s it for the access path, no separate app needed. If you’re outside China you’ll land on the international site; the interface is basically identical.
Before you upload anything, though — check your source image. I learned this the hard way after wasting a dozen generations on a photo with a cluttered background. The current consensus (and my own experience backs this up) is: one clear focal point, clean separation between subject and background, and don’t crop after generation — start in the aspect ratio you actually need. For people, faces should be sharp and well-lit. For products, avoid motion blur and make sure any text or labels are readable in the source — Kling won’t fix blurry labels, it’ll just animate the blur.
If you’re brand new and wondering how to use Kling AI without burning your free credits on guesswork: create an account first. The free tier gives you a daily credit allowance that resets every 24 hours (it doesn’t roll over, so use it or lose it), output at 720p with a watermark. Good enough to learn the ropes before you commit to a paid tier.
Step-by-Step Image-to-Video Workflow
Here’s the actual loop I run, project after project.
Upload the image. Drop your prepped photo into the Image-to-Video panel. If you’re working with multiple elements — say a product plus a hand holding it — Kling lets you upload 1–4 reference images and describe how those elements should interact through its Elements feature. I use this constantly for product work.
Write the motion prompt. This is where most people mess up, and I did too at first. Don’t redescribe what’s already in the image — Kling can see it. Your prompt should be motion only. “Slow push-in” or “subject turns head slightly toward camera, hair moves with light breeze” works. “A woman in a red dress standing in a park” does not — that’s wasted words describing pixels that already exist.
Review, regenerate, and export. Your first take rarely nails it. I generate three to five variations with small prompt tweaks before picking one — this is just how the model works right now, so budget for it mentally (and in credits). Once you’ve got a clip you like, export and, if you need a longer sequence, stitch clips together in your editor — Kling’s individual clips top out around 15 seconds even on 3.0.
Prompt Tips for Better Motion
This is the part that took me the longest to get right, so let me save you some time.
Always specify camera movement. If you don’t, you’ll get a near-static shot with the subject barely moving — boring, and a wasted generation. Kling has built-in camera movements including push, pull, pan, tilt, orbit, and zoom, and you can stack these with descriptive language in your prompt for finer control.
Give motion an endpoint. Open-ended instructions like “the car drives away” tend to confuse the model — I’ve seen this cause generations to hang or just freeze near the finish. Adding a clear end state — “…then the camera settles back to a static frame” — noticeably improves consistency. This single tip probably saved me more credits than anything else in this guide.
Watch your element count. Different Kling models have different complexity tolerances — 2.5 Turbo Pro wants 3–4 elements max in a prompt, while 2.6 can handle 5–7. Cramming a scene description full of competing details is the fastest way to get a warped, overloaded result. Less is genuinely more here.
If you’re chasing Kling AI prompts that consistently work, my honest advice: write the motion like a film director’s note, not a caption. “Camera tracks left to right following the subject, then settles” beats “a beautiful cinematic shot of a person walking” every time.

Animating Product Photos
This is where I do most of my billable work, so let me be specific.
For Kling AI product photos, the rule is: protect the product. Subtle rotations, gentle parallax, soft light shifts — that’s the safe zone. I keep negative prompts loaded with things like “no motion blur, no distortion, no warping” for anything client-facing, because a slightly warped logo is the kind of thing that gets a deliverable rejected.
For framing, generate in the aspect ratio your platform needs from the start — vertical for Reels/TikTok, square for feed posts. Don’t generate horizontal and crop later; you’ll lose the composition balance Kling worked out, and sometimes the product ends up half out of frame.
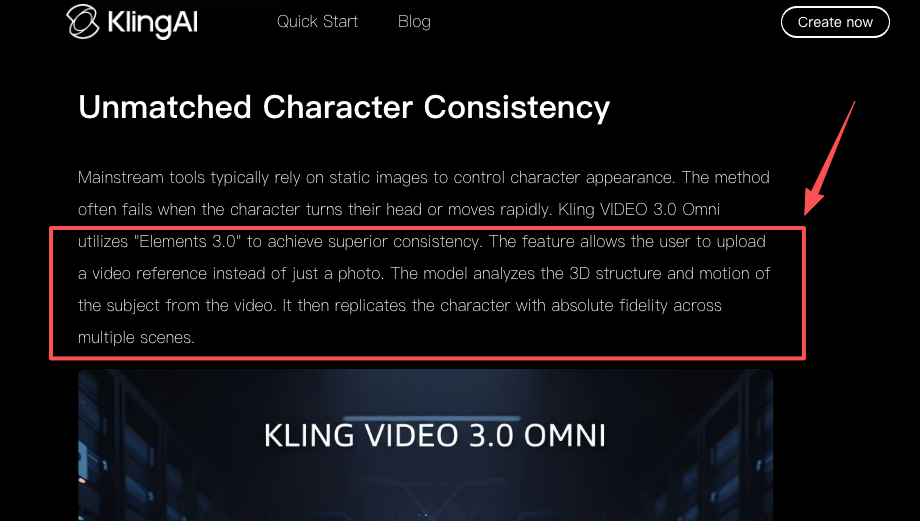
One thing that genuinely surprised me: reference-image consistency has gotten noticeably better since the Motion Control feature landed. Kling Motion Control, introduced with Kling 2.6, lets you transfer motion from a reference video onto your subject — I used this for a sneaker rotation job and it held the product shape way better than prompt-only attempts.

Limits — What Kling Still Can’t Do Well
I’m not going to pretend this thing is flawless, because it isn’t.
Hands. Still a weak spot going into 2026. If hands are visible and doing anything specific, expect extra fingers or weird bending. My workaround: keep hands out of frame, or accept you’ll need a few extra generations to get one that’s clean.
Crowded scenes. More than two or three distinct subjects, and the model starts losing track of who’s who — faces swap, bodies blend. I avoid group shots entirely for client work now; it’s just not reliable yet.
Face drift on longer clips. Even with reference images locking character appearance, faces can subtly shift over a 10-second clip. Reference images help a lot, but they don’t fully solve it.
Bad input = bad output, no exceptions. A blurry or poorly lit reference image doesn’t get “fixed” by the AI — it gets amplified. If your source photo isn’t great, don’t expect the video to be better than the photo.
None of this means Kling isn’t worth using — for the right jobs (products, scenery, portrait-style content) it’s one of the most capable tools I’ve touched. Just go in with realistic expectations about what a single generation can deliver.
FAQ
What prompts work best with Kling image-to-video? Motion-only prompts with a clear camera movement and a defined endpoint. Skip describing the image itself — focus entirely on what should change between the first and last frame.
How do I get more natural movement? Use the built-in camera movement controls (push, pull, pan, tilt, orbit, zoom) rather than relying purely on text, and keep your motion description to one clear action rather than several competing ones.
How long does a generation usually take? It varies by mode and server load — Standard generations are faster than Professional/4K runs. Either way, budget time for multiple attempts; your first result is rarely your final one.
Is there a Kling AI tutorial for absolute beginners? Start on the free tier, use a single clean image, write a one-sentence motion prompt, and generate at Standard quality before scaling up to Pro or 3.0 — that’s the whole beginner curriculum, really.
Can I use Kling for product photo animation specifically? Yes — it’s one of the strongest use cases. Keep motion subtle (rotation, gentle push-ins), lock your aspect ratio upfront, and use negative prompts to protect logos and labels from distortion.
So that’s roughly where I’m at with Kling image-to-video right now — useful, occasionally maddening, and definitely worth the learning curve if product or scenic content is your bread and butter. If you’ve found a prompt formula that consistently beats what I described here, I’d genuinely like to hear it — drop it in the comments and I’ll try breaking it next.
Previous posts: