I’m Dora. I almost gave up halfway through my first photo-to-video attempt. The face had melted into a different person, the hand grew six fingers, and the motion prompt I’d spent ten minutes writing apparently did nothing. I closed the tab, made coffee, and came back twenty minutes later.
Third try actually worked. And that’s kind of the whole story of this workflow — it’s not magic, it’s iteration.
If you’re trying to turn a still image into a short animated clip using adult-content-capable AI, this guide covers the how-to: what to prep, how to write prompts that hold up, and what to do when things go sideways. Not a tool ranking — that’s a different post.
What Photo to Video AI NSFW Tools Do
These tools take a single image and animate it — generating 3–6 seconds of video where the figure moves, breathes, shifts posture, or performs a prompted action. The “NSFW-capable” part means the model hasn’t filtered out explicit content at the generation layer.
What they don’t do: create coherent long-form scenes, maintain perfect character consistency across takes, or reliably follow complex multi-action prompts. The motion range is narrow. Think subtle — weight shifting, slow movement, fabric motion — rather than full choreography.
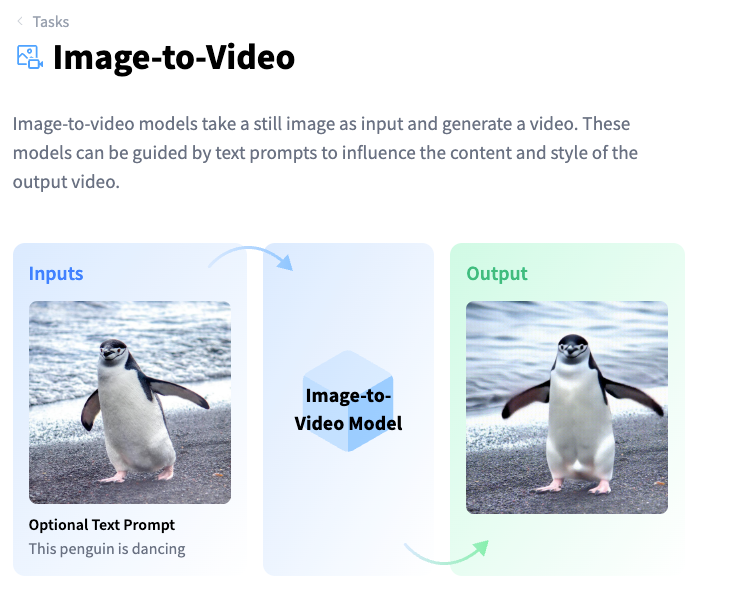
The underlying tech is image-conditioned video diffusion. The model reads your source image as a conditioning frame and generates subsequent frames that stay (loosely) consistent with it. If you want a plain-English explainer of how this category actually works, Hugging Face’s image-to-video task page breaks it down well — including the metrics researchers use to measure things like identity preservation across frames.
What You Need Before You Start
Source Image Quality and Format
This is where most people leave credits on the table. A blurry, heavily-compressed, or oddly-cropped source image will give you a worse output — no prompt will fix a bad source.
What works:
- Resolution: 1024×1024 minimum on the short edge. Anything under 512px tends to produce noticeable degradation.
- Format: PNG or high-quality JPG. Compression artifacts in the source get amplified in video. Avoid screenshots of screenshots.
- Framing: centered subject, clear negative space. If the crop cuts off limbs awkwardly, the model will try to complete them — and it usually gets it wrong.
- Lighting consistency: flat or softly directional light generates more stable motion than high-contrast dramatic lighting. The model struggles to maintain shadows across frames.
- Face clarity: if the face matters to you, it needs to be sharp and facing roughly forward. Profile angles produce drift in most current models.
One thing I learned the hard way — AI-generated images often work better as source material than photos. They’re already in a style the model understands, and they don’t carry the uncanny-valley tension between photorealistic source and AI-animated output. Stability AI’s research page is a decent place to track which underlying models are getting better at this kind of consistency, since most consumer image-to-video tools build on top of research-grade models.

Access, Credits, and Moderation Checks
Not all platforms that advertise NSFW capability are the same. A few things to verify before burning credits:
Free and “no sign-up” tiers: Most platforms with genuine NSFW capability don’t offer it on free plans. If you’re looking for a no-sign-up option, you’re mostly looking at limited public APIs or platforms where the moderation toggle is off by default — and those usually have watermarks and 480p output caps. Usable for testing a workflow, not for final output.
Age verification: Legitimate platforms gate this behind an age check or account verification step. If a tool has zero verification and full NSFW enabled out of the box, that’s a yellow flag for platform longevity — those tools tend to disappear without warning.
Credit consumption: Image-to-video is expensive relative to image generation. Budget 3–8 credits per clip depending on resolution and length. Run a low-resolution test before committing full credits to a prompt you haven’t validated.
Step-by-Step Workflow
Prepare the Image
- Upscale to at least 1024px if needed — a dedicated upscaler like Real-ESRGAN handles this better than in-browser tools.
- Crop to a ratio your target platform accepts (usually 1:1 or 16:9 — check the platform docs).
- Run a quick brightness/contrast pass if the image is very dark. Dark sources produce muddy motion.
- If the image is AI-generated and you still have the original prompt, keep it. You may want it for the motion prompt later.
Write the Motion Prompt
This is the part nobody wants to spend time on, and it’s why most outputs are disappointing.
The motion prompt describes what moves, not what exists. Your source image already handles the “what exists” part.
Structure that actually works:
[Subject movement] + [camera or environmental motion] + [pacing/speed modifier]Examples from my own testing:
- Weak: “beautiful woman, sensual” → model mostly just pulsed the image and added grain
- Better: “slow exhale, subtle chest rise, hair drifts slightly left, soft breeze from right, cinematic hold” → actual motion, face held
- Specific action: “turns head 15 degrees to right, glances down, lips part slightly, candlelight flickers” → worked, though the candlelight introduced flicker artifacts
Keep prompts under 60 words. Long prompts don’t give the model more instruction — they give it more to ignore.
Negative prompts matter more here than in image generation. Standard additions: blurry, warped face, extra limbs, morphing, bad hands, flickering, overexposed
Fix Common Artifacts
| Problem | Likely cause | Fix |
| Face drifts or morphs | Source face unclear or angled | Regenerate with cleaner source, reduce motion intensity |
| Hands gain/lose fingers | Any hand visibility in source | Mask or crop hands out of source, add bad hands to negative prompt |
| Background warps | High-contrast busy background | Use a source with simpler or blurred background |
| Motion looks like a GIF loop | Motion prompt too simple | Add directional and environmental motion cues |
| Skin tone shifts mid-clip | Lighting inconsistency in source | Flatten source lighting before upload |
The face drift issue is the most common complaint I see, and it’s almost never about the model being “bad.” It’s usually a source image problem. Profile faces, partially lit faces, and faces near the edge of frame all drift more.
Best Tools for This Workflow
I’m not going to rank or link to individual NSFW platforms here — that’s a separate post, and the landscape shifts fast enough that any list would be partially outdated within weeks.
What I will say: if you’re managing multiple inputs and want to keep script, image, and video generation in one workspace rather than jumping between five tabs, an orchestration-layer tool like CrePal handles that side reasonably well. It connects to multiple underlying models, which means when one model produces drift on a specific source image, you can swap without rebuilding your whole workflow from scratch. Note that CrePal itself is a general video creation agent, not an NSFW-specialized tool — so platform-level moderation rules still apply to whatever underlying model you route through.
For tracking the underlying open-source models specifically, the Hugging Face task page I linked earlier is the cleanest place to spot new releases before they make it into commercial integrations.
Limits, Risks, and Compliance Boundaries
This isn’t a disclaimer disclaimer — it’s stuff that will actually bite you if you skip it.
Source image consent and copyright
If you didn’t create the source image and don’t have explicit rights to it, you’re in murky territory the moment you generate derivative video from it. This applies to AI-generated images too — check the license of whatever tool generated your source. Some platforms retain commercial rights to outputs, some don’t. Creative Commons’ license overview is a readable reference for what reuse permissions actually mean if your source is CC-licensed.
Using someone’s likeness — even an AI-generated one that resembles a real person — without consent creates serious legal exposure. The federal TAKE IT DOWN Act, signed into law in May 2025, criminalizes the publication of non-consensual intimate imagery including AI-generated deepfakes, with platforms required to remove flagged content within 48 hours of a valid request. Several US states have additional laws on top of this. “I made it with AI” is not a defense.
Platform terms
Most mainstream hosting platforms (including major social networks and video hosts) prohibit explicit content regardless of how it was produced. If you’re generating clips for distribution, verify where you’re distributing before spending credits. NSFW AI video that violates a platform’s ToS gets you banned, not the AI tool.
Content that no tool should generate
No legitimate platform should generate — and no workflow in this guide covers — content involving minors, non-consensual scenarios presented approvingly, or real identifiable individuals without consent. These aren’t terms-of-service issues. They’re criminal in most jurisdictions and ethical lines that don’t move.
FAQ
What images work best for NSFW photo-to-video?
Cleanly lit, forward-facing, high-resolution images with simple backgrounds. AI-generated sources often outperform real photos because the model isn’t fighting the photorealism gap. Avoid images where hands are prominently in frame if hand accuracy matters to you — no current model handles hands reliably in motion.
Why do faces or hands drift in outputs?
Face drift comes from unclear source conditioning — angled faces, partial occlusion, or low resolution give the model less to anchor to across frames. Hand drift is a model-level limitation that hasn’t been fully solved; current image-to-video models weren’t primarily trained on hand-heavy motion sequences. Cropping hands out of the source image is the most reliable fix right now.
Can free tools make usable clips?
Technically yes, practically limited. Free tiers typically cap at 480p, add watermarks, and often exclude NSFW capability entirely. For testing a motion prompt structure, free tools work fine. For anything you’d actually distribute, you’ll need a paid plan — and the credit cost per clip means batch testing gets expensive fast. Run one validated test clip before scaling.
Conclusion
The honest version: this workflow takes more setup than most tutorials admit. The source image matters more than the prompt. The prompt matters more than the platform. None of it matters if you’re uploading a compressed, badly cropped, low-res source and expecting the model to compensate.
Get the source right first. Then spend time on motion prompts that describe movement, not aesthetics. Then worry about which tool you’re using.
I’ll keep refining this as new image-to-video models drop. The gap between “generated clip” and “actually usable clip” is closing faster than I expected six months ago.
Previous Posts: